
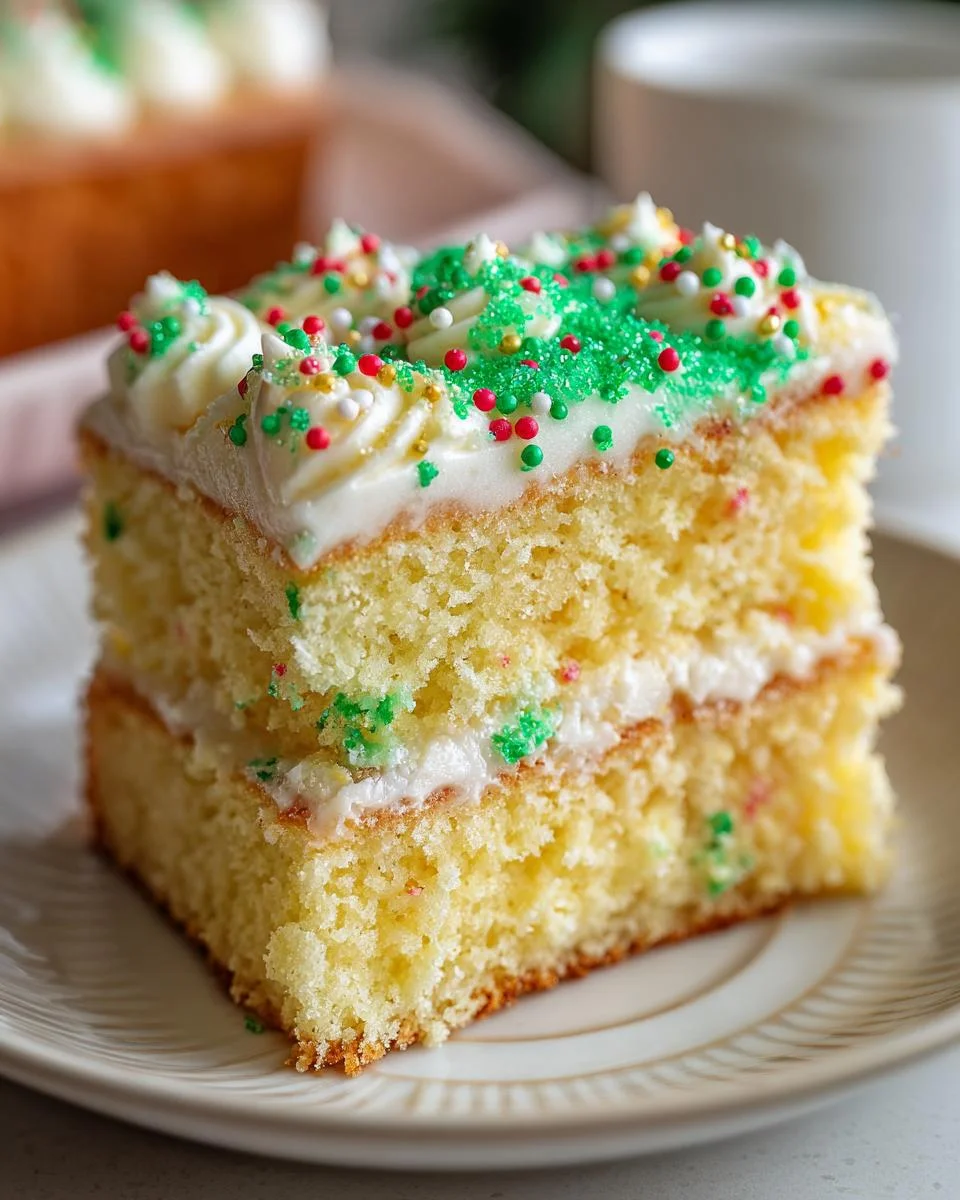
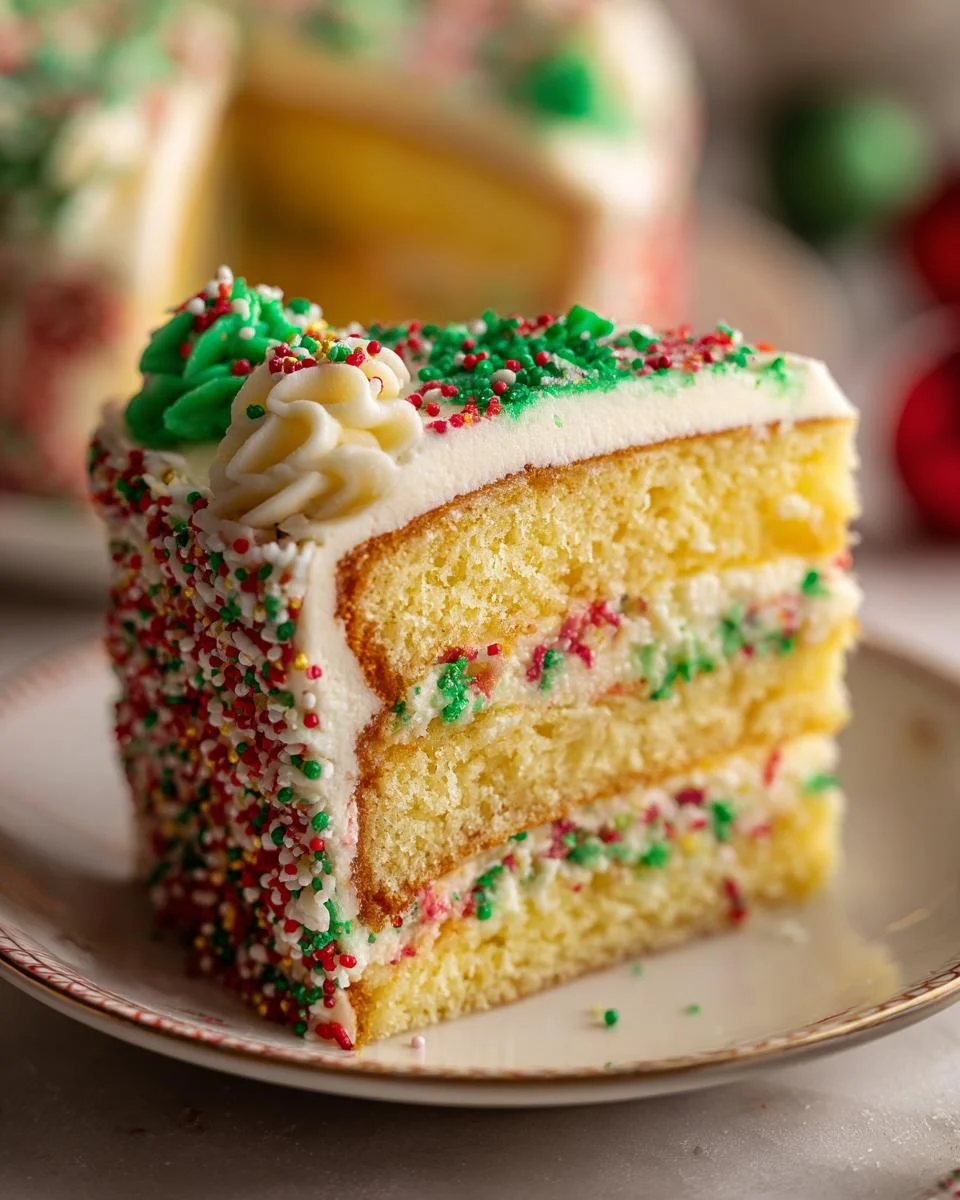
There’s something truly magical about the Little Debbie Holiday Tree Sheet Cake, and I just can’t get enough of it during the festive season! This cake isn’t just a dessert; it’s a celebration on a plate. The vibrant green frosting and festive decorations bring a burst of color to any holiday gathering, making it a favorite for everyone, young and old. I love how easy it is to whip up this delightful treat, perfect for potlucks, family gatherings, or cozy nights at home. Trust me, when you slice into that fluffy, moist cake and see the layers of creamy filling, it’ll become a holiday staple in your kitchen, just like it is in mine. So, let’s dive into making this delicious Little Debbie Holiday Tree Sheet Cake together!
Ingredients List
- 3/4 cup buttermilk, room temperature
- 2/3 cup sour cream, room temperature
- 3 large eggs, room temperature
- 1/3 cup vegetable oil
- 1 tablespoon vanilla extract
- 1 (15.25 oz) yellow cake mix
- 4 cups heavy whipping cream
- 1 teaspoon vanilla extract
- 1/2 teaspoon almond extract (optional)
- 2 cups powdered sugar
- 1/2 cup white chocolate chips
- 1/2 cup heavy cream
- 1 1/2 cups (3 sticks) unsalted butter, softened
- Pinch of salt
- 1 tablespoon vanilla extract
- 8–9 cups powdered sugar
- 1/4 cup heavy cream, as needed
- Green sanding sugar
- Holiday sprinkles
- Red gel food coloring
How to Prepare Little Debbie Holiday Tree Sheet Cake
Prepping the Cake
First things first, let’s get that oven preheated to 325°F (that’s about 160°C for my metric friends). While that’s warming up, grab a 9×13 inch baking pan and give it a good greasing and flouring—trust me, you don’t want your gorgeous cake to stick! Now, in a large mixing bowl, whisk together 3/4 cup of room temperature buttermilk, 2/3 cup of sour cream, 3 large room temperature eggs, 1/3 cup of vegetable oil, and 1 tablespoon of vanilla extract. This is where the magic begins! Once that’s smooth and lovely, sift in your 15.25 oz package of yellow cake mix and gently stir until just combined. Be careful not to overmix; we want a tender cake, not a rubbery one!
Baking and Cooling
Pour that beautiful batter into your prepared pan and pop it into the oven for about 22 to 25 minutes. You’ll know it’s ready when a toothpick inserted in the center comes out clean or with just a few moist crumbs. Once it’s done, take it out and let it cool completely in the pan on a wire rack. This cooling step is super important—if you try to slice it too soon, you might end up with a crumbly mess. I usually let mine cool for at least 30 minutes before moving it to a cutting board for a nice, clean slice.
Making the Frosting
Now, let’s whip up that dreamy frosting! Start by chilling your mixing bowl and whisk for about 5 minutes in the fridge (it helps the cream whip faster). In that chilled bowl, pour in 4 cups of heavy whipping cream. Beat it until you reach stiff peaks—this means it should hold its shape and not droop when you lift the whisk. Gradually add in 1 teaspoon of vanilla extract, 1/2 teaspoon of optional almond extract, and 2 cups of powdered sugar. This frosting is like a fluffy cloud of sweetness, and it’s going to be the perfect filling between the layers of your cake!
Assembling and Decorating
Once your cake is cool, carefully slice it horizontally into two layers. Spread that luscious frosting over the bottom layer, then place the top layer back on. Now, for the final touch! Heat 1/2 cup of white chocolate chips with 1/2 cup of heavy cream until it’s smooth, then let that cool slightly before beating 1 1/2 cups of softened butter in a separate bowl until fluffy. Mix in a pinch of salt, 1 tablespoon of vanilla extract, and the cooled white chocolate mixture. Gradually add 8–9 cups of powdered sugar until you reach your desired consistency. Frost the top and sides of your cake, saving a little bit of that buttercream to pipe borders if you want! Finally, sprinkle green sanding sugar in the center and add those festive holiday sprinkles for a pop of color. Wow, look at that masterpiece!
Why You’ll Love This Recipe
- Festive Vibes: The vibrant green frosting and cheerful decorations make this Little Debbie Holiday Tree Sheet Cake the star of any holiday gathering.
- Easy to Prepare: With simple ingredients and straightforward steps, you’ll have a stunning dessert ready in no time—perfect for both novice and seasoned bakers!
- Deliciously Decadent: The fluffy cake layers combined with creamy filling and rich buttercream create a delightful treat that will have everyone coming back for seconds.
- Perfect for Celebrations: Whether it’s a family gathering or a festive party, this cake is a crowd-pleaser that brings smiles and joy to the table.
- Customizable: Feel free to get creative with the decorations—add your favorite holiday sprinkles or colors to make it truly your own!
Tips for Success
To ensure your Little Debbie Holiday Tree Sheet Cake turns out perfect, here are a few tried-and-true tips! First, remember to chill your cake for a bit before slicing; this makes cutting those layers much easier and cleaner. If you want to switch things up, consider using a flavored frosting—coconut or peppermint extracts can add a festive twist!
Also, if you don’t have almond extract on hand, feel free to leave it out; the vanilla will still shine through beautifully. And when it comes to the frosting, if you find it too thick, just thin it with a little extra heavy cream until you achieve your desired consistency. These little adjustments will help you create a cake that’s not just beautiful but absolutely delicious!
Nutritional Information
When it comes to enjoying a slice of Little Debbie Holiday Tree Sheet Cake, it’s always good to know what you’re indulging in! Each serving, which is about one slice, is packed with flavor but does come with some calories. Here’s a quick breakdown of the estimated nutritional values:
- Calories: 350
- Fat: 20g
- Saturated Fat: 10g
- Unsaturated Fat: 8g
- Trans Fat: 0g
- Cholesterol: 60mg
- Sodium: 180mg
- Carbohydrates: 40g
- Fiber: 1g
- Sugar: 25g
- Protein: 3g
Keep in mind that these values are estimates and can vary depending on specific ingredients used. But hey, it’s the holidays, so enjoy each decadent bite guilt-free!
FAQ Section
Q1. Can I make the Little Debbie Holiday Tree Sheet Cake in advance?
Absolutely! This cake actually tastes even better when made a day ahead. Just be sure to store it covered in the refrigerator. The flavors have time to meld, and it stays fresh for up to four days, so you can enjoy it throughout the holiday festivities!
Q2. What other flavors can I add to the cake or frosting?
If you’re feeling adventurous, you can switch up the flavor profile! Try adding a splash of peppermint extract to the frosting for a refreshing twist. You could also mix in some cocoa powder to the cake batter for a chocolatey variation. The possibilities are endless!
Q3. How do I store leftover cake?
To keep your Little Debbie Holiday Tree Sheet Cake fresh, cover it tightly with plastic wrap or aluminum foil and store it in the refrigerator. It should stay delicious for up to four days. Just be sure to let it sit at room temperature for a bit before serving, as it tastes best slightly chilled.
Q4. Can I freeze the cake?
Yes, you can freeze this cake! Just wrap it well in plastic wrap and then in aluminum foil to prevent freezer burn. When you’re ready to enjoy it, let it thaw in the refrigerator overnight before serving. Just remember, the frosting may lose some of its texture, but it will still taste fabulous!
Q5. What can I substitute for heavy whipping cream in the frosting?
If you’re looking for a lighter option, you can use half-and-half instead of heavy cream, but the frosting may not be as thick or rich. Alternatively, you could use whipped topping, but make sure to adjust the sweetness since it’s already sweetened. Either way, your cake will still have that festive flair!
Serving Suggestions
When it comes to serving your Little Debbie Holiday Tree Sheet Cake, the options are deliciously endless! I love pairing it with a warm cup of spiced apple cider or rich hot chocolate, especially on chilly winter nights. The sweetness of the cake complements the cozy flavors of these drinks perfectly.
If you’re hosting a holiday gathering, consider serving it alongside a festive fruit salad or a refreshing minty green salad. The freshness of the fruit or the crisp greens balances the richness of the cake beautifully. For a little extra indulgence, why not add a scoop of vanilla ice cream or whipped cream on the side? It adds a delightful creaminess that takes the cake to another level!
And don’t forget to have some extra holiday sprinkles on hand for those who want to add a bit of flair to their slice. Enjoy the festive flavors, and let the celebrations begin!
For more recipes follow me in page Pinterest.
Print
Little Debbie Holiday Tree Sheet Cake: 5 Festive Pleasures
- Total Time: 55 minutes
- Yield: 12 servings 1x
- Diet: Vegetarian
Description
Little Debbie Holiday Tree Sheet Cake is a festive dessert perfect for celebrations.
Ingredients
- 3/4 cup buttermilk, room temperature
- 2/3 cup sour cream, room temperature
- 3 large eggs, room temperature
- 1/3 cup vegetable oil
- 1 tablespoon vanilla extract
- 1 (15.25 oz) yellow cake mix
- 4 cups heavy whipping cream
- 1 teaspoon vanilla extract
- 1/2 teaspoon almond extract (optional)
- 2 cups powdered sugar
- 1/2 cup white chocolate chips
- 1/2 cup heavy cream
- 1 1/2 cups (3 sticks) unsalted butter, softened
- Pinch of salt
- 1 tablespoon vanilla extract
- 8–9 cups powdered sugar
- 1/4 cup heavy cream, as needed
- Green sanding sugar
- Holiday sprinkles
- Red gel food coloring
Instructions
- Preheat oven to 325°F. Grease and flour a 9×13 pan.
- Whisk all cake ingredients except the cake mix. Sift in cake mix and gently stir.
- Pour into pan and bake 22–25 minutes. Cool completely.
- Carefully slice cake horizontally into two layers.
- Chill bowl and whisk for 5 minutes.
- Beat cream to stiff peaks, gradually increasing speed.
- Add vanilla, almond extract, and powdered sugar.
- Spread filling over bottom cake layer, then place top layer back on.
- Heat white chocolate and cream until smooth; set aside.
- Beat butter until fluffy. Add salt, vanilla, and white chocolate mixture.
- Gradually add powdered sugar; thin with cream if needed. Beat until light.
- Frost cake, reserving some buttercream for piping.
- Tint reserved buttercream red and pipe borders.
- Sprinkle green sanding sugar in center and add holiday sprinkles.
Notes
- Chill the cake briefly before slicing for cleaner layers.
- Almond extract is optional and can be omitted.
- Store cake covered in the refrigerator for up to 4 days.
- Prep Time: 30 minutes
- Cook Time: 25 minutes
- Category: Dessert
- Method: Baking
- Cuisine: American
Nutrition
- Serving Size: 1 slice
- Calories: 350
- Sugar: 25g
- Sodium: 180mg
- Fat: 20g
- Saturated Fat: 10g
- Unsaturated Fat: 8g
- Trans Fat: 0g
- Carbohydrates: 40g
- Fiber: 1g
- Protein: 3g
- Cholesterol: 60mg
Keywords: Little Debbie, Holiday, Cake, Dessert