
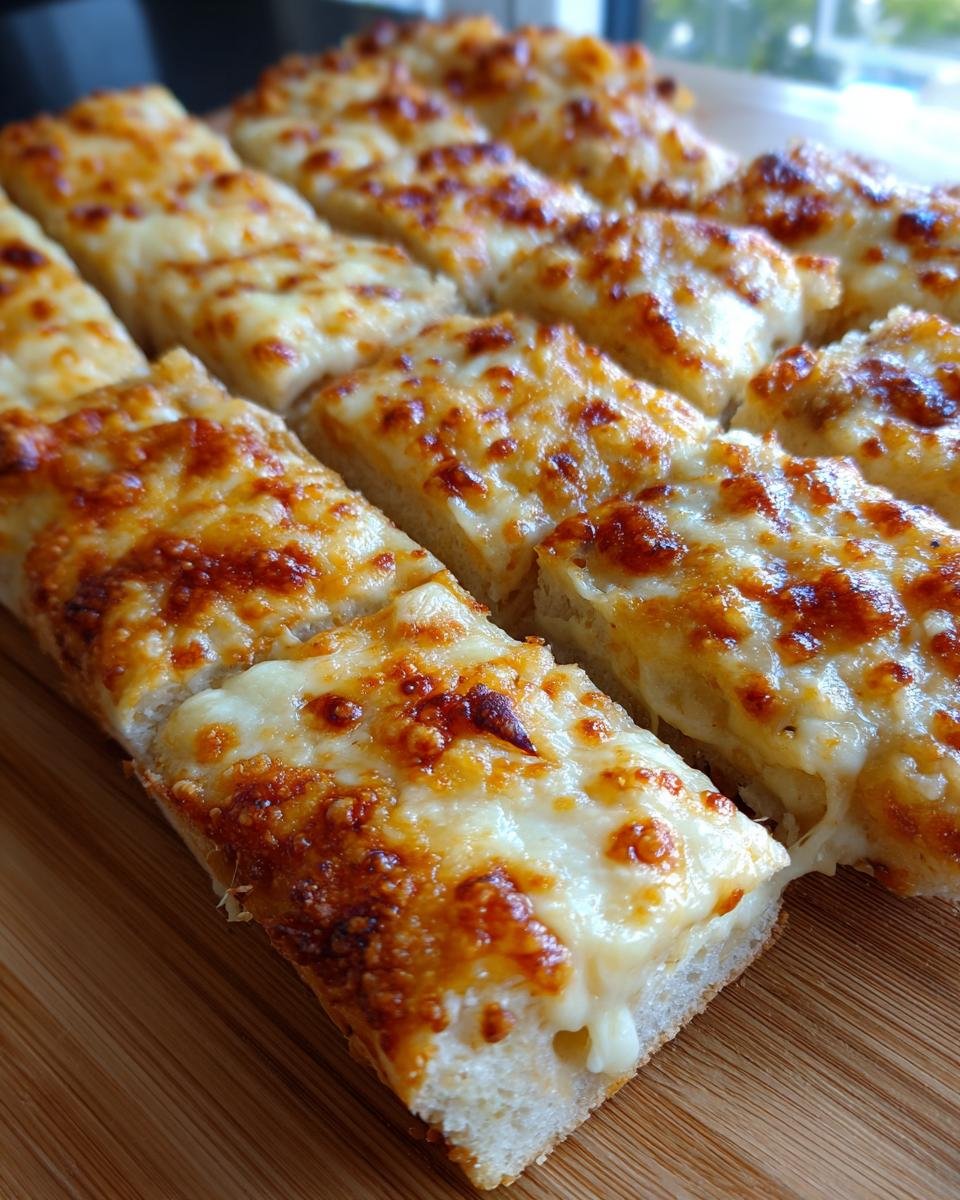
Oh my goodness, if you haven’t tried making Homemade Cheesy Garlic Breadsticks yet, you’re in for a real treat! Just imagine the aroma of fresh garlic wafting through your kitchen as these cheesy delights bake to a golden perfection. I can’t tell you how many times I’ve whipped these up for family movie nights or game days—they’re always a hit! This recipe is so simple and quick, using just a tube of refrigerated pizza crust, which means you can have warm, gooey, cheesy goodness ready in under 30 minutes. Trust me, when the cheese is bubbling and the garlic is fragrant, you’ll feel like a kitchen superstar. Plus, you can customize them with extra cheese or your favorite herbs, making this recipe a versatile go-to for any occasion. Let’s dive into the details and get you on your way to cheesy bliss!
Ingredients List
- 1 tube refrigerated pizza crust
- 1 tablespoon butter, melted
- 1 clove garlic, crushed
- 3/4 cup grated mozzarella cheese (or more, to taste)
- 1 tablespoon Parmesan cheese
- 1 teaspoon dried oregano (optional)
How to Prepare Homemade Cheesy Garlic Breadsticks Recipe
Step-by-Step Instructions
Making these Homemade Cheesy Garlic Breadsticks is a breeze! Just follow these simple steps and get ready to enjoy the cheesy goodness.
- Preheat your oven: Start by preheating your oven to 425°F (220°C). This helps to ensure your breadsticks bake evenly.
- Prepare the baking sheet: Line a baking sheet with parchment paper. This not only keeps things clean but also helps with easy removal later.
- Roll out the pizza crust: Take your refrigerated pizza crust and roll it out evenly on the prepared baking sheet. Make it as thin or thick as you like, but I generally aim for about ¼ inch thick for the perfect crunch!
- Mix the garlic butter: In a small bowl, mix together the melted butter and crushed garlic. This is where the magic happens! Brush this fragrant mixture evenly over the crust. Don’t skimp on the garlic—it’s what makes these breadsticks so irresistible!
- Add the cheese: Now sprinkle the grated mozzarella and Parmesan cheese evenly over the crust. If you’re a cheese lover like me, feel free to pile it on a bit more!
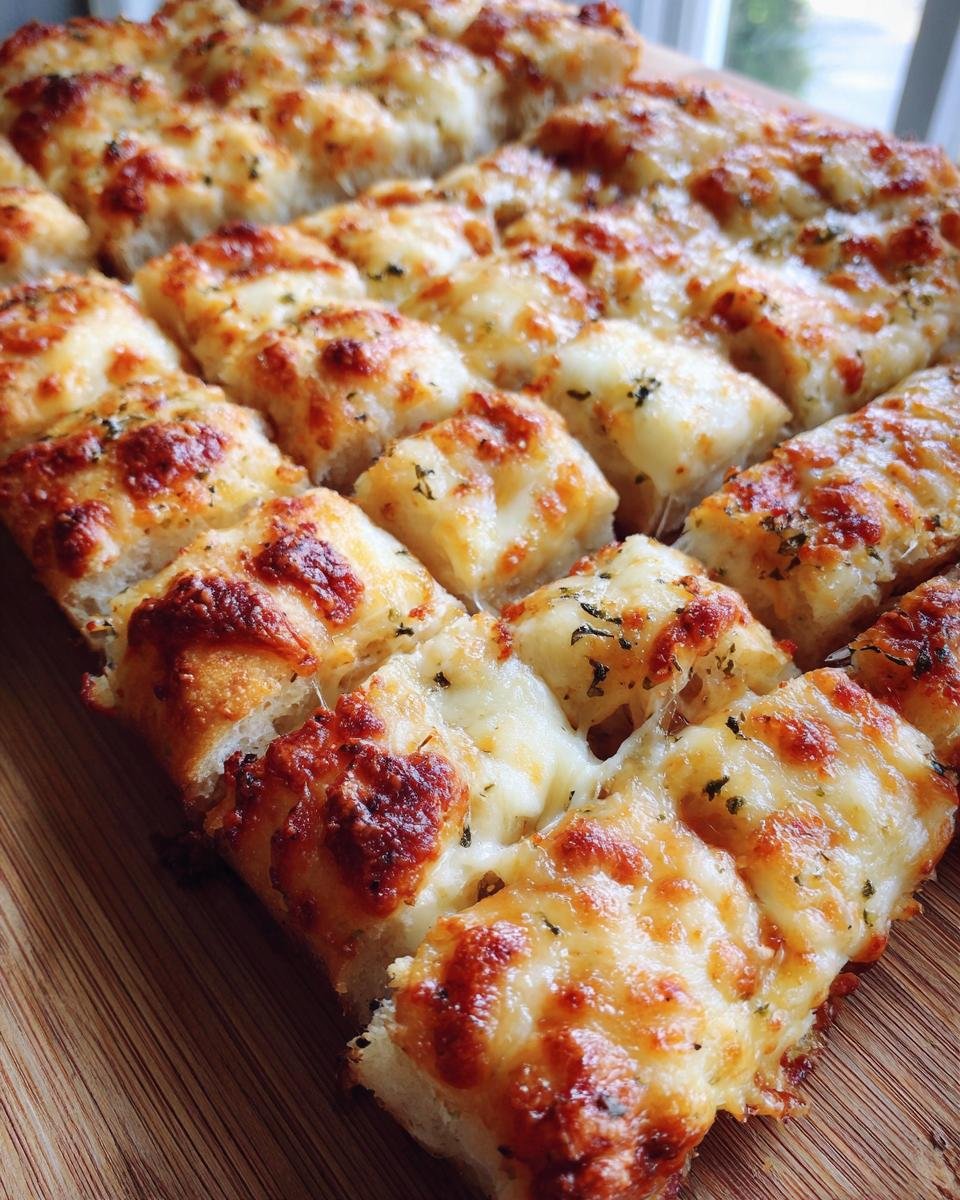
- Season it up: If you’re using dried oregano, sprinkle it over the cheese now. This adds a lovely herby note that complements the garlic beautifully.
- Cut the breadsticks: Before popping them in the oven, use a pizza cutter or a sharp knife to cut the topped crust into 16 equal rectangles. This makes it super easy to pull apart once they’re baked.
- Bake to perfection: Slide the baking sheet into the oven and bake for about 12 minutes. Keep an eye on them; you want the cheese to be melted, bubbly, and lightly golden. The aroma will be heavenly!
- Final touch: Once they’re out of the oven, cut them again along the same lines before serving. This ensures each piece is perfectly cheesy and ready to devour!
And there you have it! In just about 22 minutes, you’ll have a batch of warm, cheesy garlic breadsticks that are perfect for dipping or snacking. Enjoy every bite!
Why You’ll Love This Recipe
- Quick to Prepare: With just a few simple ingredients and a total time of only 22 minutes, you can whip up these delicious breadsticks in no time!
- Easy to Make: This recipe is perfect for cooks of all skill levels. If you can roll out dough and brush on some butter, you’re good to go!
- Deliciously Cheesy: The combination of gooey mozzarella and tangy Parmesan creates a flavor explosion that cheese lovers simply can’t resist.
- Customizable: Feel free to experiment with different cheeses, herbs, or spices. You can make these breadsticks your own every time!
- Perfect for Any Occasion: Whether it’s a cozy family dinner, a game day snack, or a party appetizer, these cheesy garlic breadsticks fit right in.
- Great for Dipping: Pair them with your favorite marinara sauce or ranch dressing for an extra delicious experience.
Tips for Success
To ensure your Homemade Cheesy Garlic Breadsticks turn out perfectly every time, here are some handy tips you won’t want to miss:
- Use fresh ingredients: Fresh garlic will give you the best flavor. Try crushing it just before using to maximize its aroma and taste.
- Don’t rush the preheating: Make sure your oven is fully preheated before baking. This helps the breadsticks rise nicely and the cheese to melt beautifully.
- Adjust the cheese to your liking: If you’re a cheese fanatic (like me!), don’t hesitate to add more mozzarella or even a blend of different cheeses for extra flavor.
- Watch the baking time: Every oven is different! Keep an eye on your breadsticks as they bake; you want them golden and bubbly but not burnt.
- Serve them hot: These breadsticks are best enjoyed fresh from the oven. If you must let them sit, pop them back in the oven for a minute to warm them up again.
Variations
If you’re ready to mix things up a bit with your Homemade Cheesy Garlic Breadsticks, you’re in luck! There are so many fun ways to personalize this recipe and keep it exciting. Here are some of my favorite variations:
- Cheese Lovers Delight: Swap out the mozzarella for a blend of your favorite cheeses like cheddar, gouda, or even pepper jack for a little kick. The more, the merrier!
- Herb Infusion: Experiment with fresh herbs like basil, thyme, or rosemary instead of dried oregano. Chopped fresh herbs can add a burst of flavor and a pop of color!
- Spicy Garlic Breadsticks: Add a pinch of red pepper flakes to the garlic butter mixture for a spicy twist. It’s a great way to bring some heat to your cheesy goodness!
- Veggie Toppings: Top your breadsticks with sautéed veggies like bell peppers, mushrooms, or spinach before baking. This adds not only flavor but also a lovely color contrast!
- Sweet and Savory: For a fun dessert twist, try brushing the crust with melted butter and cinnamon sugar instead of garlic, then topping it with a sprinkle of powdered sugar after baking.
- Garlic Parmesan Crust: For an extra garlicky flavor, mix minced garlic with the melted butter and brush it over the crust before adding cheese. Finish with a generous sprinkle of Parmesan on top for a crispy finish.
These variations not only keep your taste buds guessing but also make it easy to pair these breadsticks with different meals or occasions. Get creative and have fun experimenting!
Storage & Reheating Instructions
Got some leftover Homemade Cheesy Garlic Breadsticks? No worries! Storing them properly is key to keeping that delicious cheesy goodness intact.
Storing: Allow the breadsticks to cool completely before storing. Place them in an airtight container or wrap them tightly in plastic wrap. They’ll keep in the refrigerator for up to 3 days. If you want to store them for longer, consider freezing them! Just wrap each individual breadstick in plastic wrap and then place them in a freezer-safe bag. They can last for up to 2 months in the freezer.
Reheating: When you’re ready to enjoy your leftovers, the best way to reheat them is in the oven. Preheat your oven to 350°F (175°C). Place the breadsticks on a baking sheet and cover them loosely with aluminum foil to prevent them from drying out. Heat for about 5-8 minutes, or until they’re warmed through and the cheese is melty again. If you prefer a crispy texture, you can remove the foil for the last couple of minutes.
If you’re in a hurry, you can also pop them in the microwave for about 20-30 seconds, but be careful not to overdo it—nobody likes rubbery breadsticks! Enjoy your cheesy treat just as if they were fresh out of the oven!
Nutritional Information Section
When it comes to enjoying Homemade Cheesy Garlic Breadsticks, it’s always nice to know what you’re indulging in! Here’s a general breakdown of the nutritional values per breadstick, based on the ingredients used:
- Calories: 110
- Fat: 5 g
- Saturated Fat: 2 g
- Unsaturated Fat: 3 g
- Trans Fat: 0 g
- Cholesterol: 10 mg
- Sodium: 190 mg
- Carbohydrates: 11 g
- Fiber: 1 g
- Sugar: 1 g
- Protein: 4 g
Keep in mind, these values are estimates and can vary based on specific brands and amounts of ingredients used. But hey, knowing what’s in your cheesy goodness makes it all the more enjoyable, right? So go ahead and savor every delicious bite of your homemade creation!
FAQ Section
Q1. Can I use a different type of dough for the Homemade Cheesy Garlic Breadsticks?
Absolutely! While I love using refrigerated pizza crust for its convenience, you can also try using homemade dough or even crescent roll dough for a flakier texture. Just keep an eye on the baking time, as it may vary slightly.
Q2. What can I dip my cheesy garlic breadsticks in?
Oh, the possibilities are endless! I recommend pairing them with marinara sauce, ranch dressing, or even a creamy garlic dip. They’re also fantastic with a zesty pesto sauce—just think of all the flavor combinations!
Q3. How do I make these breadsticks gluten-free?
You can definitely make gluten-free Homemade Cheesy Garlic Breadsticks! Just use a gluten-free pizza crust instead of the regular one. Many grocery stores carry ready-made gluten-free options that work perfectly in this recipe.
Q4. Can I prepare the dough ahead of time?
Yes, you can! If you want to get a head start, you can roll out the pizza crust and add the toppings ahead of time, then cover it tightly and refrigerate it for a few hours. Just be sure to bake it within 24 hours for the best flavor and texture.
Q5. What’s the best way to reheat leftover breadsticks?
For the best results, I recommend reheating them in the oven. Preheat to 350°F (175°C), cover them with aluminum foil to retain moisture, and heat for about 5-8 minutes. This keeps them crispy on the outside and melty on the inside—just like fresh out of the oven!
For more recipes follow me in page Pinterest.
Print
Homemade Cheesy Garlic Breadsticks Recipe to Savor Today
- Total Time: 22 minutes
- Yield: 16 breadsticks 1x
- Diet: Vegetarian
Description
Homemade Cheesy Garlic Breadsticks Recipe
Ingredients
- 1 tube refrigerated pizza crust
- 1 tablespoon butter, melted
- 1 clove garlic, crushed
- 3/4 cup grated mozzarella cheese (or more, to taste)
- 1 tablespoon Parmesan cheese
- 1 teaspoon dried oregano (optional)
Instructions
- Preheat the oven to 425°F (220°C). Line a baking sheet with parchment paper.
- Roll out the pizza crust evenly on the prepared baking sheet.
- Mix the melted butter with the crushed garlic and brush evenly over the crust.
- Sprinkle mozzarella and Parmesan evenly over the crust, then add oregano if using.
- Before baking, cut the topped crust into 16 equal rectangles using a pizza cutter or knife.
- Bake for about 12 minutes, until the cheese is melted, bubbly, and lightly golden.
- Remove from the oven and cut again along the same lines before serving.
Notes
- For extra cheesy breadsticks, increase the mozzarella to 1–1½ cups.
- Dried parsley or dried basil can be used instead of oregano.
- Best enjoyed warm, straight from the oven.
- Prep Time: 10 minutes
- Cook Time: 12 minutes
- Category: Appetizer
- Method: Baking
- Cuisine: Italian
Nutrition
- Serving Size: 1 breadstick
- Calories: 110
- Sugar: 1 g
- Sodium: 190 mg
- Fat: 5 g
- Saturated Fat: 2 g
- Unsaturated Fat: 3 g
- Trans Fat: 0 g
- Carbohydrates: 11 g
- Fiber: 1 g
- Protein: 4 g
- Cholesterol: 10 mg
Keywords: Homemade Cheesy Garlic Breadsticks, Garlic Breadsticks Recipe, Cheesy Breadsticks