
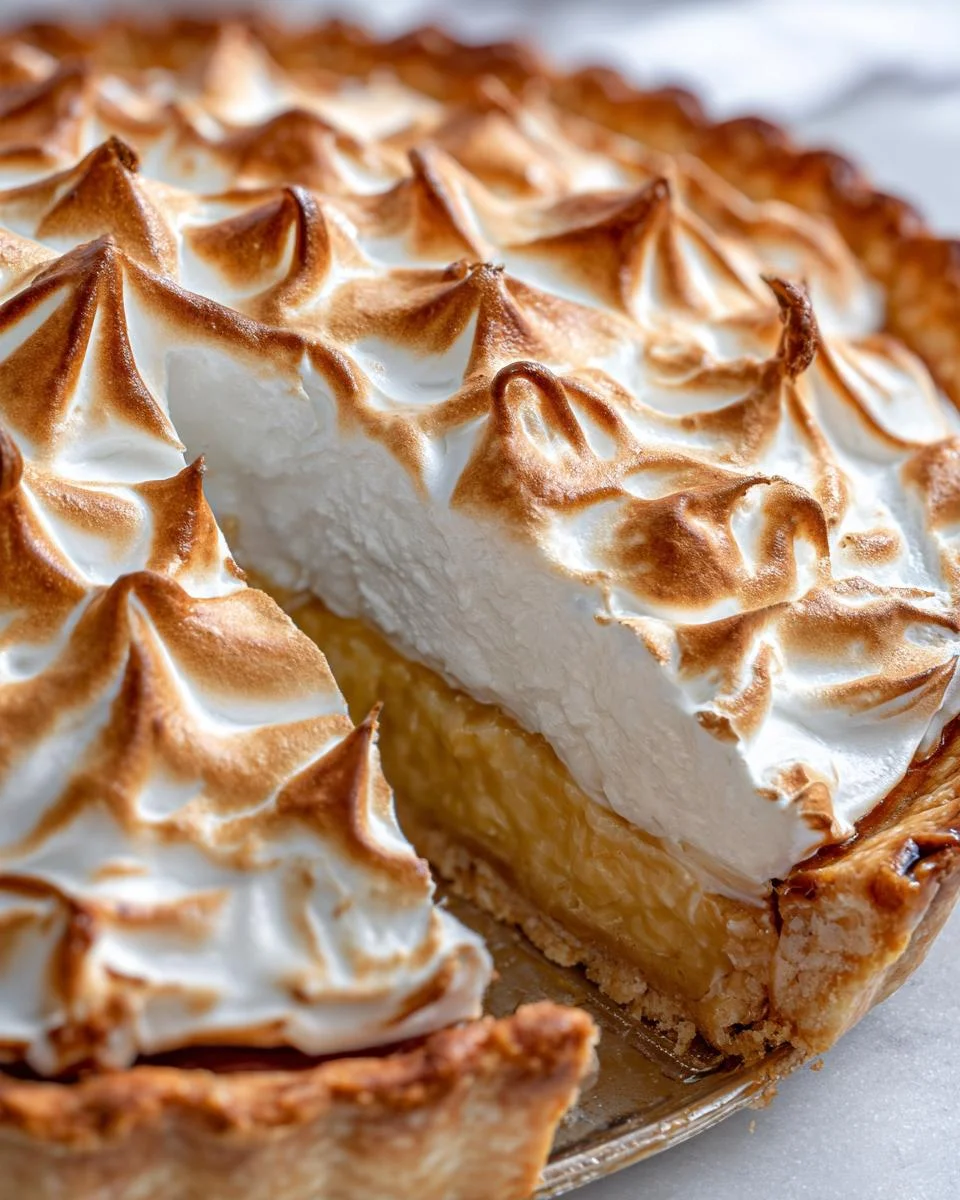
There’s something incredibly nostalgic about homemade desserts, isn’t there? The smell of sweet butterscotch wafting through the kitchen instantly transports me back to family gatherings, where everyone gathered around the table, eagerly waiting for a slice of my Homemade Butterscotch Cream Pie. This pie is a showstopper, featuring a luxuriously rich butterscotch filling that sings with flavor and is topped with fluffy, cloud-like meringue. Every bite is a delightful experience – creamy, sweet, and just the right amount of decadent. I remember the first time I made this pie for a holiday dinner; it was an instant hit! My family couldn’t stop raving about it, and it quickly became a staple at our celebrations. Trust me, once you’ve tasted this pie, you’ll understand why it holds such a special place in my heart and why it should in yours too!
Ingredients List
- 1 – 9 inch pre-baked pie shell, shallow
- 1 cup packed brown sugar, half light and half dark
- 1/4 cup cornstarch
- 1/2 teaspoon salt
- 2 cups milk, 2% or whole
- 2/3 cup half & half
- 5 1/3 tablespoons unsalted butter
- 3 large egg yolks, slightly beaten
- 2 teaspoons pure vanilla extract
- 4 large egg whites, room temperature
- 1 cup granulated sugar
- 1/8 teaspoon cream of tartar
- 1/2 teaspoon pure vanilla extract (for meringue)
How to Prepare Homemade Butterscotch Cream Pie
Prepare the Butterscotch Filling
Let’s dive into the rich, creamy filling that makes this pie so special! First things first, grab a medium bowl and add your slightly beaten egg yolks. Make sure you have a whisk nearby because you’ll need it in a moment. In a large saucepan, combine the packed brown sugar, cornstarch, salt, milk, and half & half. Stir everything together until it’s well mixed. Now, place the saucepan over medium heat and bring the mixture to a boil, stirring constantly. This is key—don’t walk away! You want to keep stirring for about a minute once it reaches a full boil.
Once it’s bubbling away, take the pan off the heat. Pour about half of the hot mixture into the bowl with your egg yolks, whisking quickly to combine. This step is crucial to temper the eggs and prevent them from scrambling. Then, pour everything back into the saucepan and return it to the heat. Cook for another minute, stirring until the mixture thickens. You’ll know it’s ready when it starts to bubble slightly again. Remove it from the heat and add in the butter and pure vanilla extract, mixing until it’s all combined and smooth. Pour that glorious filling into your pre-baked pie shell and set it aside while we whip up that dreamy meringue!
Make the Meringue Topping
Now, let’s create that fluffy meringue topping that takes this pie over the top! Start by filling a medium saucepan about a quarter full with water and bring it to a gentle simmer over medium heat. In a heatproof bowl, combine the egg whites, granulated sugar, and cream of tartar. Place this bowl over the saucepan, ensuring it doesn’t touch the water. Whisk the mixture gently until it’s warm to the touch and the sugar has dissolved—this should take about 3 minutes. It’s essential to keep the heat low so you don’t cook the eggs.
Once that’s done, transfer the bowl to a stand mixer fitted with a whisk attachment. Start mixing on low speed for about a minute, then crank it up to high speed. Beat until you achieve stiff, glossy peaks—this usually takes around 10 minutes. Just before you finish, add in the remaining vanilla extract and mix until combined. This fluffy meringue is going to be the crown jewel of your pie!
Assemble and Bake
Alright, it’s time to put this masterpiece together! Preheat your oven to 350°F (175°C) while you pile that beautiful meringue onto the hot butterscotch filling. Don’t be shy—go ahead and spread it high, making sure to seal the edges to prevent it from shrinking during baking. Now, pop the pie in the oven for about 5 minutes to heat the filling and set that meringue just a bit. Keep an eye on it as it bakes; you want the top to turn a delicate golden brown, which should take about 8 minutes.
Once it’s done, remove it from the oven and let it cool to room temperature before refrigerating it. It’s best to let it chill for at least two hours before serving. Trust me, the waiting is worth it! You’ll be rewarded with a slice of pure bliss—creamy, sweet, and oh-so-satisfying. Now, get ready to impress your family and friends with this incredible Homemade Butterscotch Cream Pie!
Why You’ll Love This Recipe
- Rich Flavor: The combination of brown sugar and vanilla gives this pie a deep, satisfying butterscotch flavor that’s hard to resist!
- Easy to Make: With straightforward steps and accessible ingredients, you’ll find this recipe perfect for both beginner and seasoned bakers.
- Perfect for Gatherings: This pie is a crowd-pleaser! It’s sure to impress at any gathering, from family dinners to holiday feasts.
- Nostalgic Comfort Food: Each bite takes you back to simpler times, bringing warmth and comfort that only homemade desserts can provide.
- Vegetarian-Friendly: This delightful dessert caters to vegetarian diets, making it a great choice for everyone at the table!
Tips for Success
Now that you’re well on your way to making this amazing Homemade Butterscotch Cream Pie, let me share some tips that’ll help ensure your pie turns out perfectly every time!
Preventing a Weeping Meringue
One common issue with meringue is that it can weep, meaning moisture seeps out and leaves a puddle on your pie. To avoid this, make sure your meringue is whipped to stiff peaks—that’s crucial! Also, try to spread the meringue all the way to the edges of the pie crust to seal it off from the filling. This not only looks beautiful but also helps prevent shrinking and weeping.
Temperature Matters
When you’re making that luscious butterscotch filling, be sure to use room temperature egg yolks. This helps them incorporate more easily into the filling. For the meringue, the egg whites should also be at room temperature before whipping. They’ll whip up fluffier and give you those gorgeous peaks!
Whisking Technique
While whisking the egg whites over simmering water, make sure to keep the heat low. You want the mixture to be warm, not hot, as overheating can cook the eggs prematurely. Keep whisking until you can’t feel any sugar granules—this ensures a smooth and glossy meringue!
Cooling Time
After baking, it’s essential to let your pie cool completely to room temperature before refrigerating. This helps the filling set properly and allows the flavors to meld beautifully. Trust me, a little patience goes a long way here!
Storage Tips
If you have leftovers (which is rare with this pie!), store them in the refrigerator, but be mindful that the meringue may start to weep after a day. If you want to keep it looking pristine, consider making the meringue fresh for each serving instead of topping the entire pie at once.
Follow these tips, and you’ll be well on your way to mastering the art of the Homemade Butterscotch Cream Pie! Happy baking!
Variations
Now that you’ve mastered the classic Homemade Butterscotch Cream Pie, let’s have some fun with variations that can take this dessert to new delicious heights! Trust me, experimenting is part of the joy of baking!
Different Pie Crusts
While a traditional pre-baked pie shell is fantastic, why not switch it up a bit? You could try a graham cracker crust for a delightful crunch that pairs beautifully with the creamy filling. Just crush some graham crackers, mix them with melted butter and a bit of sugar, then press it into your pie dish and bake until golden. Or, go for a chocolate cookie crust using crushed Oreos for a rich, decadent twist!
Chocolate Butterscotch Cream Pie
If you’re a chocolate lover (who isn’t?), you can easily incorporate that flavor into your pie. Simply melt some semi-sweet or dark chocolate and mix it into the butterscotch filling before pouring it into the crust. This creates a luscious chocolate butterscotch experience that’s just divine. Top it all off with that fluffy meringue, and you’ll have a showstopper!
Nuts for Crunch
Adding nuts can give your pie an extra layer of flavor and texture. Try folding in some finely chopped pecans or walnuts into the butterscotch filling for a delightful crunch. You could also sprinkle some toasted nuts on top of the meringue right before baking, which not only adds flavor but also gives a lovely presentation. Just be sure to chop them finely so they don’t overwhelm the pie!
Spiced Butterscotch Cream Pie
Want to warm things up? Consider adding a pinch of cinnamon or nutmeg to the butterscotch filling for a cozy twist. These spices complement the sweetness of the butterscotch perfectly and make each bite feel like a warm hug on a chilly day. You could even add a splash of bourbon for a sophisticated, grown-up flavor that really elevates the pie!
Fruit Additions
For a fruity spin, you can layer some fresh banana slices or diced apples at the bottom of the pie crust before pouring in the butterscotch filling. The fruit brings a refreshing contrast to the richness of the pie and adds a lovely splash of color. Just be sure to adjust the sweetness a bit, as the fruit will bring its own natural sugars!
These variations not only keep things exciting but also make the Homemade Butterscotch Cream Pie a versatile dessert that can cater to different tastes. So, don’t hesitate to get creative and make this recipe your own! Happy baking!
Storage & Reheating Instructions
Alright, let’s talk about keeping your delicious Homemade Butterscotch Cream Pie fresh and flavorful! If you’ve managed to have any leftovers (which is a miracle, honestly), here’s how to store them properly.
First things first, make sure the pie is completely cooled to room temperature before you store it. This allows the filling to set nicely and helps prevent moisture from forming inside the storage container. Once it’s cool, cover the pie with plastic wrap or aluminum foil. If you want to be extra careful, you can place it in an airtight container to keep it as fresh as possible.
Your pie will keep beautifully in the refrigerator for up to 5 days. Just keep in mind that the meringue may start to weep after the first day, so it’s best to enjoy it within that time frame for optimal texture and flavor. If you find yourself with leftover meringue, you might want to save it for fresh servings instead of topping the entire pie all at once.
Now, if you’re craving a slice and want to enjoy it warm, you can reheat individual slices in the microwave. Just pop a slice on a microwave-safe plate, cover it loosely with a paper towel to avoid splatters, and heat for about 15-20 seconds. Keep an eye on it to make sure it doesn’t get too hot! If you prefer to reheat the entire pie, set your oven to 350°F (175°C), cover the top with foil to prevent the meringue from browning too much, and warm it for about 10-15 minutes until the filling is heated through.
With these simple storage and reheating tips, you can savor every last bite of your Homemade Butterscotch Cream Pie! Enjoy!
Nutritional Information
Here’s a quick look at the estimated nutritional information for a slice of this delightful Homemade Butterscotch Cream Pie. Keep in mind that these numbers can vary a bit based on the specific ingredients you use, but this should give you a good idea!
- Serving Size: 1 slice
- Calories: 300
- Total Fat: 12g
- Saturated Fat: 7g
- Unsaturated Fat: 4g
- Trans Fat: 0g
- Cholesterol: 80mg
- Sodium: 150mg
- Total Carbohydrates: 42g
- Dietary Fiber: 1g
- Sugars: 25g
- Protein: 4g
This information is an estimate, so feel free to adjust it based on your specific ingredients. Enjoy every slice of this creamy, indulgent pie guilt-free!
FAQ Section
Q1: How can I prevent the meringue from weeping?
To prevent a weeping meringue, it’s essential to whip the egg whites to stiff peaks and spread the meringue all the way to the edges of the pie crust. This seals the filling and keeps moisture from escaping. Also, make sure to bake the meringue until it’s just golden and set, as this helps create a stable structure.
Q2: Can I make the Homemade Butterscotch Cream Pie ahead of time?
Absolutely! You can prepare the butterscotch filling and the pie crust a day in advance. Just keep them covered in the refrigerator. However, I recommend adding the meringue topping fresh on the day you plan to serve it for the best texture and appearance.
Q3: What should I do if my meringue collapses?
If your meringue collapses, it could be due to not whipping it long enough or not achieving stiff peaks. Always ensure your mixing bowl and whisk are clean and free of any grease, as even a small amount can affect the egg whites. If it does collapse, you can still serve the pie; it will taste just as delicious!
Q4: Can I use a store-bought pie crust for this recipe?
Of course! A store-bought pie crust can save you time and still deliver great results. Just make sure to follow the package instructions for pre-baking to ensure it holds up against the creamy filling.
Q5: How long can I store the Homemade Butterscotch Cream Pie?
The pie can be stored in the refrigerator for up to 5 days. Keep it covered to maintain freshness. Just a heads up—after the first day, the meringue may start to weep, so it’s best to enjoy the pie within that time frame for optimal texture.
Q6: Is it possible to freeze the pie?
While it’s generally not recommended to freeze the meringue due to texture changes, you can freeze the butterscotch filling and pie crust separately. Just assemble and add fresh meringue when you’re ready to serve for the best results!
For more recipes follow me in page Pinterest.
Print
Homemade Butterscotch Cream Pie: 5 Steps to Pure Bliss
- Total Time: 50 minutes
- Yield: 8 servings 1x
- Diet: Vegetarian
Description
This Homemade Butterscotch Cream Pie features a rich butterscotch filling topped with fluffy meringue.
Ingredients
- 1 – 9 inch pre baked pie shell, shallow
- 1 cup packed brown sugar, half light and half dark
- 1/4 cup cornstarch
- 1/2 teaspoon salt
- 2 cups milk, 2% or whole
- 2/3 cup half & half
- 5 1/3 tablespoons unsalted butter
- 3 egg yolks, slightly beaten
- 2 teaspoons pure vanilla extract
- 4 large egg whites, room temperature
- 1 cup sugar
- 1/8 teaspoon cream of tartar
- 1/2 teaspoon pure vanilla extract
Instructions
- Add the beaten egg yolks to a 2 cup measuring cup or medium bowl and have a whisk nearby.
- Combine the sugar, cornstarch, salt, milk and half & half in a large saucepan. Bring to a boil over medium heat while stirring constantly. Boil for 1 minute.
- Remove pan from heat and pour about one half of the hot mixture into the egg yolks and immediately whisk to combine. Add the egg mixture back to the pan and return the pan to the heat. Cook for about 1 minute until mixture begins to thicken and remove from heat.
- Add butter and vanilla and mix until combined and smooth. Pour into the pre baked pie shell. Set pie aside while making the meringue.
- If using whipped topping, refrigerate pie until cold before adding topping.
- Fill a medium saucepan about 1/4 full with water and bring to a simmer over medium heat.
- Add egg whites, sugar and cream of tartar to a heatproof bowl. Whisk to combine and place bowl over the pan of simmering water. Whisk until egg whites are warm and sugar has dissolved, about 3 minutes.
- Transfer bowl to a stand mixer and beat on low speed for about 1 minute, then increase to high. Whisk until very stiff glossy peaks form, about 10 minutes. Add vanilla and mix to combine.
- Place pie in preheated oven for 5 minutes to heat the filling.
- Pile meringue high onto hot pie filling and spread to the edges to prevent shrinking. Bake for approximately 8 minutes until the top is delicately browned.
- Cool pie to room temperature and refrigerate. Serve at room temperature or cold after at least 2 hours.
- Pie will keep refrigerated for up to 5 days, but meringue may weep after 1 day.
Notes
- For a darker butterscotch pie, replace 1 cup of milk with 1 cup of water.
- Prep Time: 30 minutes
- Cook Time: 20 minutes
- Category: Dessert
- Method: Baking
- Cuisine: American
Nutrition
- Serving Size: 1 slice
- Calories: 300
- Sugar: 25g
- Sodium: 150mg
- Fat: 12g
- Saturated Fat: 7g
- Unsaturated Fat: 4g
- Trans Fat: 0g
- Carbohydrates: 42g
- Fiber: 1g
- Protein: 4g
- Cholesterol: 80mg
Keywords: Butterscotch Cream Pie, Dessert, Homemade Pie