
No-bake desserts are like the ultimate lifesavers in the kitchen, aren’t they? They’re quick, simple, and oh-so-delicious! One of my absolute favorites has to be Greek Yogurt Cheesecake. This cheesecake is a game changer, combining the rich creaminess of traditional cheesecake with the health benefits of Greek yogurt. You won’t believe how easy it is to whip up this delightful treat without turning on the oven or using any gelatin!
Imagine indulging in a slice of creamy goodness that not only satisfies your sweet tooth but also packs in protein and probiotics. With a hint of zesty lemon and the smoothness of cream cheese, this Greek Yogurt Cheesecake is a refreshing twist on a classic favorite. Whether you’re hosting a dinner party or just treating yourself (no judgment here!), this cheesecake is sure to impress. Trust me, once you try it, you’ll be keeping this recipe on repeat!
Ingredients for Greek Yogurt Cheesecake
- 2 cups Greek yogurt
- 1 cup cream cheese, softened
- 1/2 cup sugar
- 1 teaspoon vanilla extract
- 1/4 cup lemon juice
- 1 graham cracker crust
How to Prepare Greek Yogurt Cheesecake
Now that you’ve gathered your ingredients, let’s dive into the delicious process of making this Greek Yogurt Cheesecake! I promise, it’s super straightforward and totally worth the wait. Follow these steps, and you’ll have a creamy, dreamy cheesecake ready to chill in no time!
Step 1: Mix the Base
First things first, grab a mixing bowl—make sure it’s big enough for all that creamy goodness! Start by combining the 2 cups of Greek yogurt and the 1 cup of softened cream cheese. Using a hand mixer or a whisk, blend them together until the mixture is perfectly smooth and creamy. You want to achieve a texture that’s free of lumps, so take your time here. Trust me, this step is crucial for that velvety mouthfeel!
Step 2: Add Sweetness and Flavor
Once your base is nice and smooth, it’s time to sweeten things up! Add in the 1/2 cup of sugar, 1 teaspoon of vanilla extract, and 1/4 cup of lemon juice. Mix everything together really well until you can’t see any sugar granules. The lemon juice adds a refreshing zing that balances the creaminess, so don’t skip it! It’s all about that perfect blend of flavors!
Step 3: Assemble the Cheesecake
Now comes the fun part—pouring that luscious mixture into the graham cracker crust. Take a spatula and gently level the mixture in the crust, making sure it’s evenly distributed. This helps ensure that every slice looks as good as it tastes! You can give it a little shake to settle the mixture if you need to. It’s so satisfying to see it come together!
Step 4: Chill and Set
Time to let this beauty chill! Place your cheesecake in the refrigerator for at least 4 hours. I know, I know—waiting can be tough! But this step is super important because it allows the cheesecake to set up properly. The chilling time helps the flavors meld together and gives you that perfect slice that holds its shape. You’ll be rewarded for your patience, I promise!
Why You’ll Love This Recipe
- No baking required: This recipe is perfect for those hot days when you don’t want to turn on the oven!
- Gelatin-free: You get a creamy texture without any gelatin, making it a great option for vegetarians.
- Healthy alternative: Packed with protein and probiotics from Greek yogurt, this cheesecake is a guilt-free indulgence!
- Quick to prepare: With just 15 minutes of prep time, you can whip this up and let it chill while you relax.
- Customizable: Feel free to add your favorite fruit toppings or flavorings to make it uniquely yours!
Tips for Success with Greek Yogurt Cheesecake
Alright, let’s make sure your Greek Yogurt Cheesecake turns out absolutely perfect! Here are my top tips to help you nail every bite:
- Use full-fat Greek yogurt: Trust me on this one! Full-fat Greek yogurt gives you that rich, creamy texture that makes this cheesecake so dreamy. Low-fat versions just won’t cut it!
- Softened cream cheese is key: Make sure your cream cheese is softened before mixing. It blends easier and helps create that velvety smoothness we’re aiming for. Leave it out at room temperature for about an hour before you start!
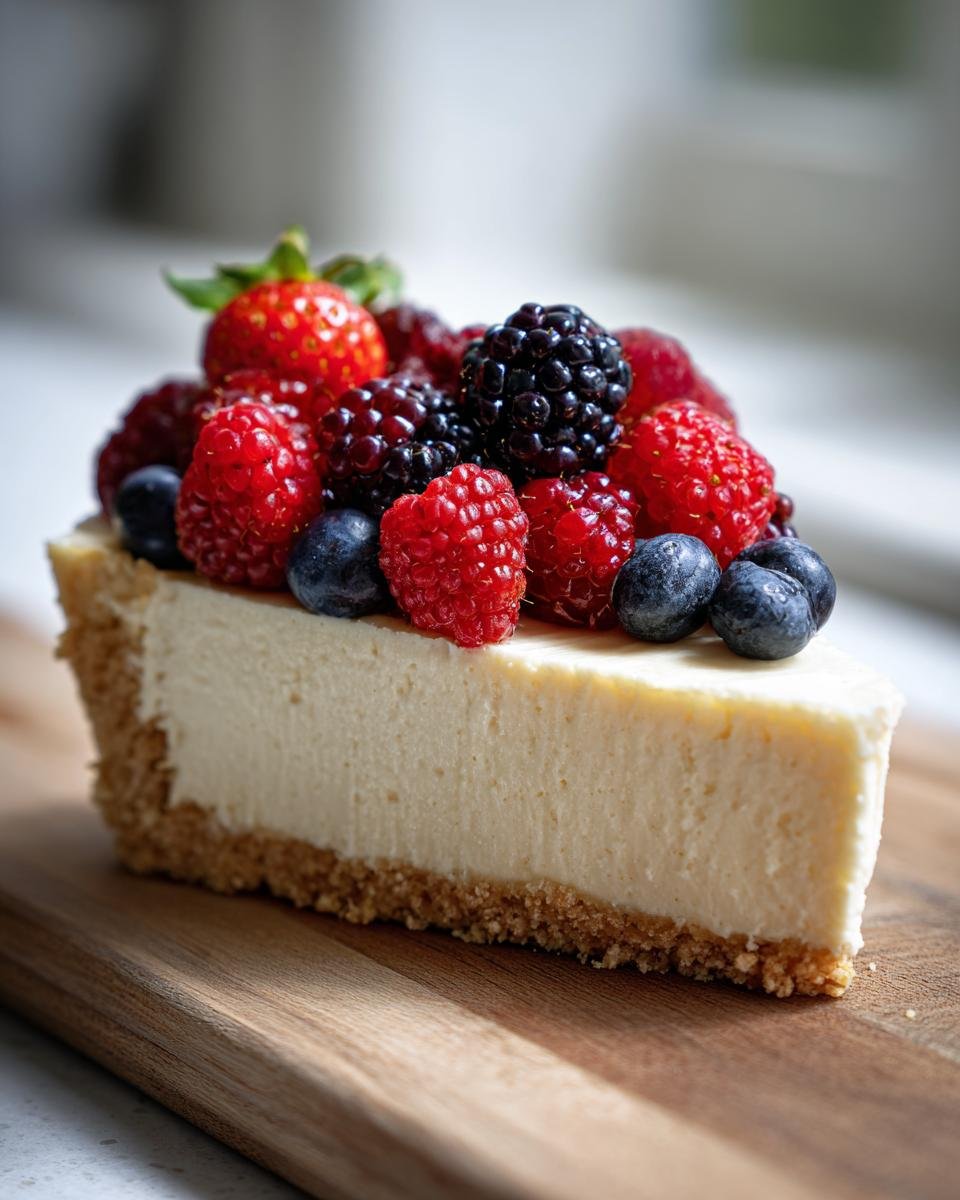
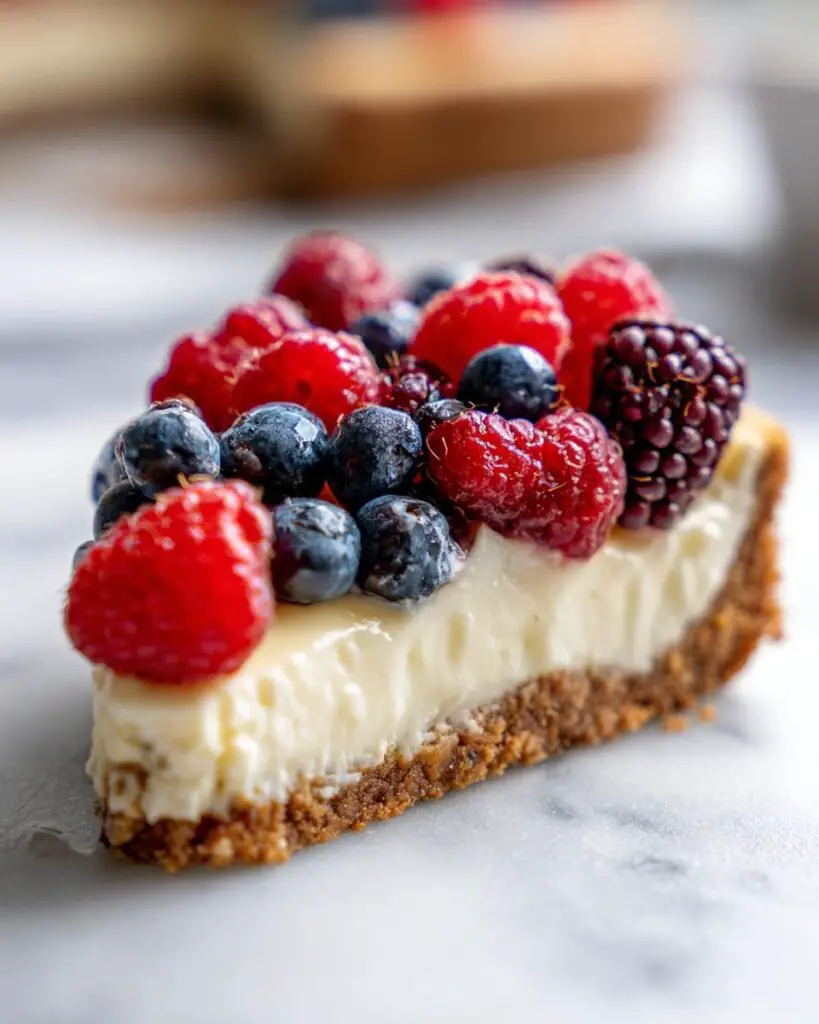
- Experiment with toppings: Don’t be shy about adding your favorite toppings! Fresh berries, a drizzle of honey, or even a sprinkle of crushed nuts can take your cheesecake to the next level. Get creative!
- Chill it overnight: If you can, let it chill overnight. This allows the flavors to meld beautifully, and you’ll get an even better texture. Plus, it’ll be ready for you to enjoy the next day!
- Keep an eye on the chilling time: While I recommend at least 4 hours, the longer you chill, the firmer your cheesecake will be. Just be sure not to rush this step!
- Serve it cold: For the best experience, serve your cheesecake straight from the fridge. That cool, creamy goodness is what makes each slice so refreshing!
With these tips in your back pocket, you’re well on your way to mastering this delightful Greek Yogurt Cheesecake. Happy baking!
Variations on Greek Yogurt Cheesecake
Now that you’ve got the basic Greek Yogurt Cheesecake down, let’s have some fun with it! There are so many ways to switch things up and make this dessert uniquely yours. Here are a few delicious variations to consider:
Try Different Crusts
While a classic graham cracker crust is a favorite, why not mix it up? You can use:
- Chocolate cookie crust: Use crushed chocolate sandwich cookies for a rich, decadent base that pairs beautifully with the creamy filling.
- Almond or coconut crust: For a nutty flavor, try a crust made from ground almonds or shredded coconut mixed with a bit of melted butter.
- Oreo crust: If you’re feeling indulgent, an Oreo crust adds a delightful chocolatey crunch that complements the cheesecake perfectly!
Flavor Infusions
Add a personal touch by infusing different flavors into your cheesecake! Here are a few ideas:
- Chocolate swirl: Melt some dark chocolate and swirl it into the cheesecake mixture before pouring it into the crust for a rich chocolatey twist.
- Fruit purees: Blend fresh or frozen fruits like strawberries, blueberries, or mangoes, and fold the puree into the mixture for a fruity cheesecake that bursts with flavor.
- Spices: A pinch of cinnamon or nutmeg can add warmth and depth to your cheesecake. Just be careful not to overpower the delicate flavors!
Top It Off
The toppings can elevate your cheesecake to a whole new level! Here are some scrumptious ideas:
- Fresh fruit: Top with an assortment of berries, sliced peaches, or citrus segments for a bright, refreshing finish.
- Chocolate ganache: Drizzle a silky chocolate ganache over the top for a luxurious touch that chocolate lovers will adore.
- Coconut whipped cream: For a lighter topping, try whipped coconut cream sprinkled with toasted coconut flakes. It adds a tropical flair!
With these variations, you’ll never get bored of your Greek Yogurt Cheesecake! Feel free to experiment and find your favorite combinations. Happy creating!
Nutritional Information for Greek Yogurt Cheesecake
Let’s talk nutrition! It’s always good to know what you’re indulging in, right? Here’s a handy breakdown of the estimated nutritional values for a slice of this creamy Greek Yogurt Cheesecake. Keep in mind that these values can vary based on the specific ingredients you use and portion sizes, but this should give you a solid idea:
- Calories: 210
- Fat: 10g
- Saturated Fat: 5g
- Unsaturated Fat: 3g
- Trans Fat: 0g
- Cholesterol: 30mg
- Sodium: 150mg
- Carbohydrates: 25g
- Fiber: 1g
- Sugar: 14g
- Protein: 6g
This Greek Yogurt Cheesecake not only satisfies your sweet cravings but also brings some protein and healthy fats to the table, making it a delightful treat without the guilt! Enjoy every slice!
FAQ About Greek Yogurt Cheesecake
Got questions about Greek Yogurt Cheesecake? No worries, I’ve got you covered! Here are some common queries and my answers to help you navigate this creamy delight:
- Can I use low-fat yogurt? While you can use low-fat Greek yogurt, I highly recommend sticking with full-fat for the best texture and creaminess. Low-fat options might yield a less rich cheesecake, so if you want that dreamy consistency, go full-fat!
- How long can I store leftovers? If you have any leftover cheesecake (which is rare, trust me!), you can store it in an airtight container in the fridge for up to 5 days. Just make sure to keep it chilled to enjoy that refreshing taste!
- Can I freeze Greek Yogurt Cheesecake? Absolutely! You can freeze individual slices or the whole cheesecake. Just wrap it tightly in plastic wrap and then in aluminum foil to prevent freezer burn. It’ll keep for about 2 months. When you’re ready to enjoy, let it thaw in the fridge overnight.
- Can I make this cheesecake ahead of time? Yes, you can! This cheesecake is perfect for making a day or two in advance. Just let it chill in the fridge, and it’ll be ready to impress your guests when the time comes!
- What can I use instead of a graham cracker crust? If graham cracker crust isn’t your thing, no problem! You can use crushed cookies like Oreos, or even make a nut-based crust using almonds or walnuts mixed with melted butter for a gluten-free option!
- Can I add more flavors to the cheesecake? You bet! Feel free to get creative by adding melted chocolate, fruit purees, or spices to the mixture. Just remember to keep the balance of ingredients so the texture remains creamy!
If you have any more questions or need further clarification, don’t hesitate to ask! I’m here to help you make the best Greek Yogurt Cheesecake ever!
What to Serve with Greek Yogurt Cheesecake
Now that you’ve got a creamy Greek Yogurt Cheesecake ready to impress, let’s talk about what to serve alongside it! Pairing this delightful dessert with the right dishes or beverages can elevate the whole dining experience. Here are some of my favorite ideas:
Fruits and Berries
Fresh fruits are a natural companion for this cheesecake. Consider serving:
- Mixed Berries: A medley of strawberries, blueberries, and raspberries adds a burst of color and tartness that complements the cheesecake’s creamy sweetness.
- Sliced Peaches or Nectarines: Their juicy, fragrant flesh brings a lovely summery vibe that pairs beautifully with the cheesecake.
- Citrus Segments: Orange or grapefruit segments can add a refreshing zesty contrast that brightens each bite!
Drizzles and Sauces
A drizzle of sauce can take your cheesecake to the next level! Consider these delicious options:
- Honey or Maple Syrup: A light drizzle of honey or pure maple syrup adds a touch of sweetness that enhances the flavors beautifully.
- Berry Sauce: Simmer some berries with a bit of sugar until they break down, then drizzle this vibrant sauce over the cheesecake for a colorful and tasty touch.
- Chocolate Sauce: If you’re a chocolate lover, a warm chocolate sauce can add a rich, indulgent element that’s hard to resist!
Beverage Pairings
Don’t forget about drinks! Here are some refreshing beverages that match perfectly with your cheesecake:
- Herbal Tea: A soothing herbal tea, like chamomile or mint, provides a light finish and won’t overpower the flavors of the cheesecake.
- Fresh Lemonade: A cold glass of lemonade brings a zesty brightness that complements the creaminess of the cheesecake beautifully.
- Prosecco or Sparkling Wine: For a festive touch, a glass of bubbly adds a celebratory flair, making your dessert feel extra special!
With these pairing suggestions, you’ll create a delightful experience that showcases your Greek Yogurt Cheesecake in the best light. Enjoy every delicious bite and sip!
Storage & Reheating Instructions
So, you’ve whipped up this delightful Greek Yogurt Cheesecake, and now you’re left with some delicious leftovers (if you’re lucky!). Here’s how to store them properly so you can enjoy every last bite!
First off, to keep your cheesecake fresh, wrap it tightly in plastic wrap or place it in an airtight container. This helps prevent it from absorbing any fridge odors and keeps that creamy texture intact. You can store it in the refrigerator for up to 5 days. Just make sure to keep it chilled until you’re ready to serve!
If you find yourself with a larger portion or want to save some for later, you can also freeze your cheesecake. Just slice it up (if you prefer individual servings), and wrap each slice in plastic wrap, then place them in a freezer-safe container or bag. It’ll stay good in the freezer for about 2 months. When you’re ready to enjoy, simply transfer a slice to the fridge to thaw overnight. This way, you’ll have a ready-to-eat treat waiting for you!
When it comes time to serve your chilled cheesecake, I recommend enjoying it straight from the fridge for that refreshing taste. If you’d like, feel free to add some fresh fruit or a drizzle of sauce right before serving to elevate those flavors. Trust me, there’s nothing quite like a cold slice of Greek Yogurt Cheesecake to brighten your day!
For more recipes follow me in page Pinterest.
Print
Greek Yogurt Cheesecake: 5 Reasons to Indulge Guilt-Free
- Total Time: 4 hours 15 minutes
- Yield: 8 servings 1x
- Diet: Vegetarian
Description
A creamy and delicious Greek yogurt cheesecake that’s easy to make without baking or gelatin.
Ingredients
- 2 cups Greek yogurt
- 1 cup cream cheese, softened
- 1/2 cup sugar
- 1 teaspoon vanilla extract
- 1/4 cup lemon juice
- 1 graham cracker crust
Instructions
- In a mixing bowl, combine Greek yogurt and cream cheese until smooth.
- Add sugar, vanilla extract, and lemon juice. Mix well.
- Pour the mixture into the graham cracker crust.
- Chill in the refrigerator for at least 4 hours.
- Serve chilled and enjoy.
Notes
- Use full-fat Greek yogurt for best results.
- Feel free to add fruit toppings.
- Prep Time: 15 minutes
- Cook Time: 0 minutes
- Category: Dessert
- Method: No-bake
- Cuisine: Greek
Nutrition
- Serving Size: 1 slice
- Calories: 210
- Sugar: 14g
- Sodium: 150mg
- Fat: 10g
- Saturated Fat: 5g
- Unsaturated Fat: 3g
- Trans Fat: 0g
- Carbohydrates: 25g
- Fiber: 1g
- Protein: 6g
- Cholesterol: 30mg
Keywords: Greek Yogurt Cheesecake, no-bake cheesecake, gelatin-free cheesecake