
Oh, let me tell you about my absolute love for onigiri! These delightful little rice balls are a staple in Japanese cuisine, and they hold a special place in my heart. I remember the first time I made Easy Japanese Tuna Onigiri; it was a rainy afternoon, and I just wanted something cozy and delicious to munch on. This recipe is so straightforward, even if you’re a kitchen novice! With just a handful of ingredients, you can whip up these tasty snacks in no time.
What I adore about onigiri is their versatility. You can enjoy them as a quick meal on the go, a fun snack for movie night, or even a cute addition to a bento box. Plus, the combination of tender sushi rice and savory tuna filling is absolutely scrumptious. You can really customize the flavors to suit your taste buds. Trust me, once you get the hang of shaping these little triangles, you’ll be making them all the time! It’s the perfect way to bring a little bit of Japan into your home kitchen.
Ingredients List
Gathering the right ingredients is key to making the best Easy Japanese Tuna Onigiri. Here’s what you’ll need:
- 2 cups sushi rice: This is the star of the show! Sushi rice is short-grain and sticky, perfect for holding your onigiri together.
- 1 can tuna, drained: Choose your favorite tuna—white albacore or chunk light both work well. Drain it thoroughly to avoid a soggy filling!
- 2 tablespoons mayonnaise: This adds creaminess to the tuna mixture. You can use regular or Japanese mayonnaise for a richer flavor.
- 1 tablespoon soy sauce: A splash of soy sauce gives that umami kick that pairs beautifully with the tuna.
- 1 teaspoon sesame oil: Just a hint of this nutty oil elevates the flavor of your filling.
- Salt, to taste: Don’t forget to season your mixture! A little salt will enhance all the flavors.
- Nori sheets, cut into strips: These seaweed sheets are perfect for wrapping your onigiri and adding a delightful crunch.
Make sure to have everything prepped and ready before you start cooking; it makes the process smooth and oh-so-enjoyable! Happy cooking!
How to Prepare Easy Japanese Tuna Onigiri
Now comes the fun part—making your Easy Japanese Tuna Onigiri! This step-by-step guide will help you create these delightful rice balls with ease. Just follow along, and you’ll be enjoying your homemade onigiri in no time!
Step-by-Step Instructions
First things first, let’s get that sushi rice ready. Rinse 2 cups of sushi rice under cold water until the water runs clear. This step is super important! It washes away excess starch and helps achieve that perfect sticky texture. Once rinsed, let the rice drain for a bit.
Next, cook the rice according to the package instructions. This usually takes about 20 minutes, but make sure to keep an eye on it! Once it’s done, remove it from the heat and let it cool slightly. You want it warm, but not too hot to handle—this is key for shaping your onigiri!
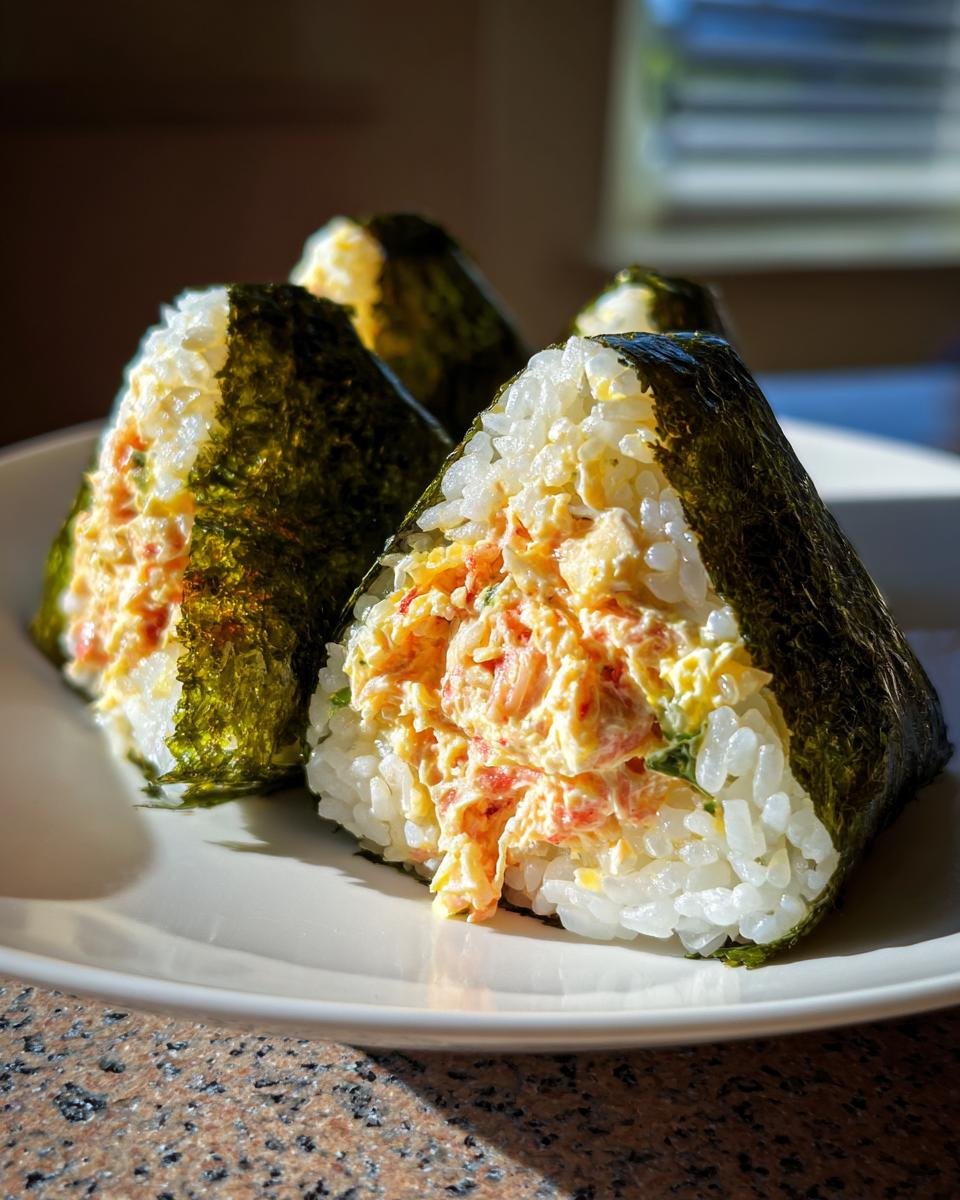
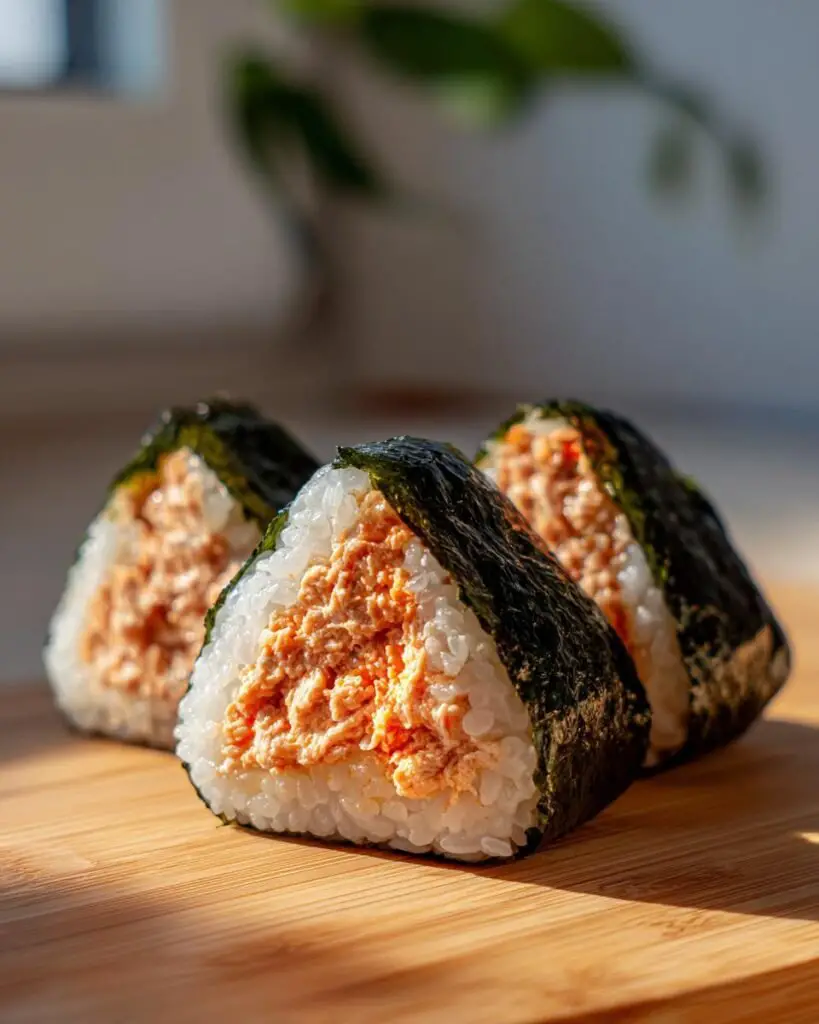
While the rice is cooling, let’s whip up the filling. In a mixing bowl, combine 1 can of drained tuna with 2 tablespoons of mayonnaise, 1 tablespoon of soy sauce, 1 teaspoon of sesame oil, and a pinch of salt to taste. Mix everything together until it’s well combined. This creamy and flavorful filling is what makes your onigiri shine!
Once your rice has cooled a bit, it’s time to shape the onigiri! Wet your hands with a little water to prevent the rice from sticking. Take a scoop of rice—about the size of a small tennis ball—and flatten it gently in the palm of your hand. The flattened rice should create a nice base for your filling.
Now, add a spoonful of that delicious tuna mixture right in the center of the rice. Carefully shape the rice around the filling, pressing gently to mold it into a triangle. Don’t worry if it takes a few tries to get the shape just right! The more you practice, the better you’ll become.
Finally, take a strip of nori and wrap it around the bottom of your onigiri for a lovely finishing touch. This not only adds flavor but also makes it easier to hold. Repeat this process until you’ve used up all your ingredients. You’ll end up with about four delightful onigiri ready to be enjoyed!
And there you have it! Your Easy Japanese Tuna Onigiri is now ready. Serve them immediately or store them in an airtight container if you’re saving them for later. Trust me, they taste just as good the next day!
Why You’ll Love This Recipe
- Quick and Easy: This recipe comes together in just about 35 minutes, making it perfect for those busy days when you need a tasty snack or light meal in a hurry.
- Customizable: You can easily tweak the filling ingredients to suit your taste! Whether you want to add chopped veggies, switch up the protein, or experiment with different sauces, the options are endless.
- Healthy Snack: Packed with protein from the tuna and wholesome carbs from the sushi rice, these onigiri are a nutritious choice that will keep you satisfied without weighing you down.
- Great for Meal Prep: Make a batch ahead of time, and you’ll have delicious snacks ready to go! Just store them in an airtight container, and they’ll be good for a couple of days.
- Fun to Make: Shaping the onigiri into triangles is a hands-on activity that can be a fun experience for the whole family. Get the kids involved and enjoy some quality time in the kitchen!
- Delicious Flavor: The combination of creamy tuna, savory soy sauce, and nutty sesame oil creates a flavor explosion that’s hard to resist. Plus, the crunchy nori adds the perfect texture contrast!
Tips for Success
To make sure your Easy Japanese Tuna Onigiri turns out perfectly every time, I’ve got some handy tips that have worked wonders for me!
Getting the Rice Just Right
The texture of your sushi rice is crucial! Rinsing it well is a must—don’t skip this step! When you rinse, keep going until the water runs clear. This helps remove excess starch, giving you that ideal sticky consistency that holds everything together. If you find that your rice is too dry after cooking, you can sprinkle a little water over it while it’s cooling to help it soften up.
Perfecting the Filling
Feel free to customize the tuna filling to your liking. If you’re a fan of a bit of spice, try adding a touch of sriracha or wasabi to the mixture for an extra kick! You can also mix in some chopped green onions or even avocado for a creamier texture. Just remember to keep the balance—too much liquid can make your filling runny, so adjust carefully!
Shaping Your Onigiri
Shaping the onigiri can be a bit tricky at first, but practice makes perfect! Wet your hands before handling the rice to keep it from sticking, and try to use just the right amount of pressure when forming the triangles. If you find the rice is too sticky, don’t hesitate to wet your hands again! And if you’re struggling with the triangle shape, don’t stress—round shapes work just as well and are just as delicious!
Storage Tips
If you’re not eating all your onigiri right away, store them in an airtight container. They’re best enjoyed fresh, but they can last for a couple of days in the fridge. Just keep in mind that the nori will lose its crunch over time, so you might want to add that just before serving if possible.
With these tips, you’ll be on your way to making delightful, delicious Easy Japanese Tuna Onigiri that everyone will love! Happy cooking!
Nutritional Information Section
When you’re whipping up Easy Japanese Tuna Onigiri, it’s always nice to know what you’re putting into your body. Here’s an estimated nutritional breakdown for one onigiri:
- Calories: 200
- Fat: 9g
- Saturated Fat: 1g
- Unsaturated Fat: 7g
- Trans Fat: 0g
- Cholesterol: 20mg
- Sodium: 300mg
- Carbohydrates: 28g
- Fiber: 1g
- Sugar: 1g
- Protein: 8g
Keep in mind that these values are estimates and can vary based on the specific ingredients you use. If you choose to add or swap out any ingredients, it’s a good idea to recalculate to fit your dietary needs. Enjoy your onigiri with peace of mind, knowing they’re not just delicious but also a wholesome snack option!
FAQ Section
Common Questions About Onigiri
As you dive into making Easy Japanese Tuna Onigiri, you might have a few questions. Don’t worry—I’ve got you covered with some common queries that pop up often!
Q: Can I use other fillings besides tuna?
Absolutely! Onigiri is super versatile, and you can fill them with a variety of ingredients. Popular alternatives include cooked salmon, pickled plum (umeboshi), or even sautéed vegetables. Just make sure your filling isn’t too wet, or it might make the rice soggy!
Q: What type of rice should I use?
For the best texture, stick to sushi rice, which is short-grain and sticky. It helps the onigiri hold their shape. If sushi rice isn’t available, you can use other types of short-grain rice, but avoid long-grain varieties as they won’t give you that perfect stickiness.
Q: How do I keep the nori from getting soggy?
To maintain that delightful crunch, try to wrap the nori around your onigiri just before you eat them. If you’re preparing them ahead of time, you can store the nori separately and assemble them right before serving!
Q: Can I make these ahead of time?
Yes! You can prepare the rice and filling ahead of time, and then assemble the onigiri when you’re ready to eat. Just remember that they’re best enjoyed fresh, but if you store them in an airtight container in the fridge, they’ll be good for a couple of days.
Q: Is it necessary to season the rice?
While the seasoning isn’t a must, a little sprinkle of salt can enhance the overall flavor of your onigiri. Some people even add a splash of rice vinegar and sugar to the cooked rice for that classic sushi rice taste. It’s all about your personal preference!
With these answers to your common questions, you’ll be well-prepared to create delicious Easy Japanese Tuna Onigiri that will impress your friends and family. Happy cooking!
Storage & Reheating Instructions
Storing your Easy Japanese Tuna Onigiri properly is essential to keeping them fresh and delicious! If you find yourself with leftovers (which is rare, but it can happen), here’s how to store them for later enjoyment.
First, let your onigiri cool completely before storing them. This is to prevent condensation from forming inside the container, which can make the rice soggy. Once they’re cool, place your onigiri in an airtight container. If you’ve wrapped them in nori, it’s best to eat them within a day or two, as the nori will lose its crispiness over time. But if you store them without nori, they can last up to three days in the fridge!
Now, if you want to maintain that delicious texture and flavor, here’s how to reheat them:
- Microwave: If you’re in a hurry, the microwave is your best friend! Place your onigiri on a microwave-safe plate and cover them with a damp paper towel. This helps keep the rice moist. Heat them for about 15-30 seconds, checking to ensure they don’t get too hot. The warm, fluffy rice will make you feel like you just made them fresh!
- Steamer: For an even better texture, you can use a steamer. Just place the onigiri in the steamer basket over boiling water, cover, and steam for around 5-7 minutes. This method helps retain moisture and ensures your onigiri are as delightful as the moment they were made!
Remember, while it’s tempting to make a big batch for meal prep, onigiri are best enjoyed fresh. But with these storage and reheating tips, you can enjoy your Easy Japanese Tuna Onigiri even days later. Happy snacking!
For more recipes follow me in page Pinterest.
Print
Easy Japanese Tuna Onigiri: 5 Steps to Cozy Delight
- Total Time: 35 minutes
- Yield: 4 servings 1x
- Diet: Gluten Free
Description
A simple recipe for homemade Japanese tuna onigiri.
Ingredients
- 2 cups sushi rice
- 1 can tuna, drained
- 2 tablespoons mayonnaise
- 1 tablespoon soy sauce
- 1 teaspoon sesame oil
- Salt, to taste
- Nori sheets, cut into strips
Instructions
- Rinse sushi rice under cold water until water runs clear.
- Cook rice according to package instructions.
- In a bowl, mix tuna, mayonnaise, soy sauce, sesame oil, and salt.
- Once rice is cooked, let it cool slightly.
- Wet your hands and take a scoop of rice, flatten it in your palm.
- Add a spoonful of the tuna mixture in the center.
- Shape the rice around the filling into a triangle.
- Wrap with a strip of nori.
- Repeat until all ingredients are used.
Notes
- Use short-grain rice for the best texture.
- Adjust filling ingredients to your taste.
- Store in an airtight container if not eaten immediately.
- Prep Time: 15 minutes
- Cook Time: 20 minutes
- Category: Snack
- Method: No-cook and stovetop
- Cuisine: Japanese
Nutrition
- Serving Size: 1 onigiri
- Calories: 200
- Sugar: 1g
- Sodium: 300mg
- Fat: 9g
- Saturated Fat: 1g
- Unsaturated Fat: 7g
- Trans Fat: 0g
- Carbohydrates: 28g
- Fiber: 1g
- Protein: 8g
- Cholesterol: 20mg
Keywords: Easy Japanese Tuna Onigiri, Onigiri, Tuna Rice Balls