
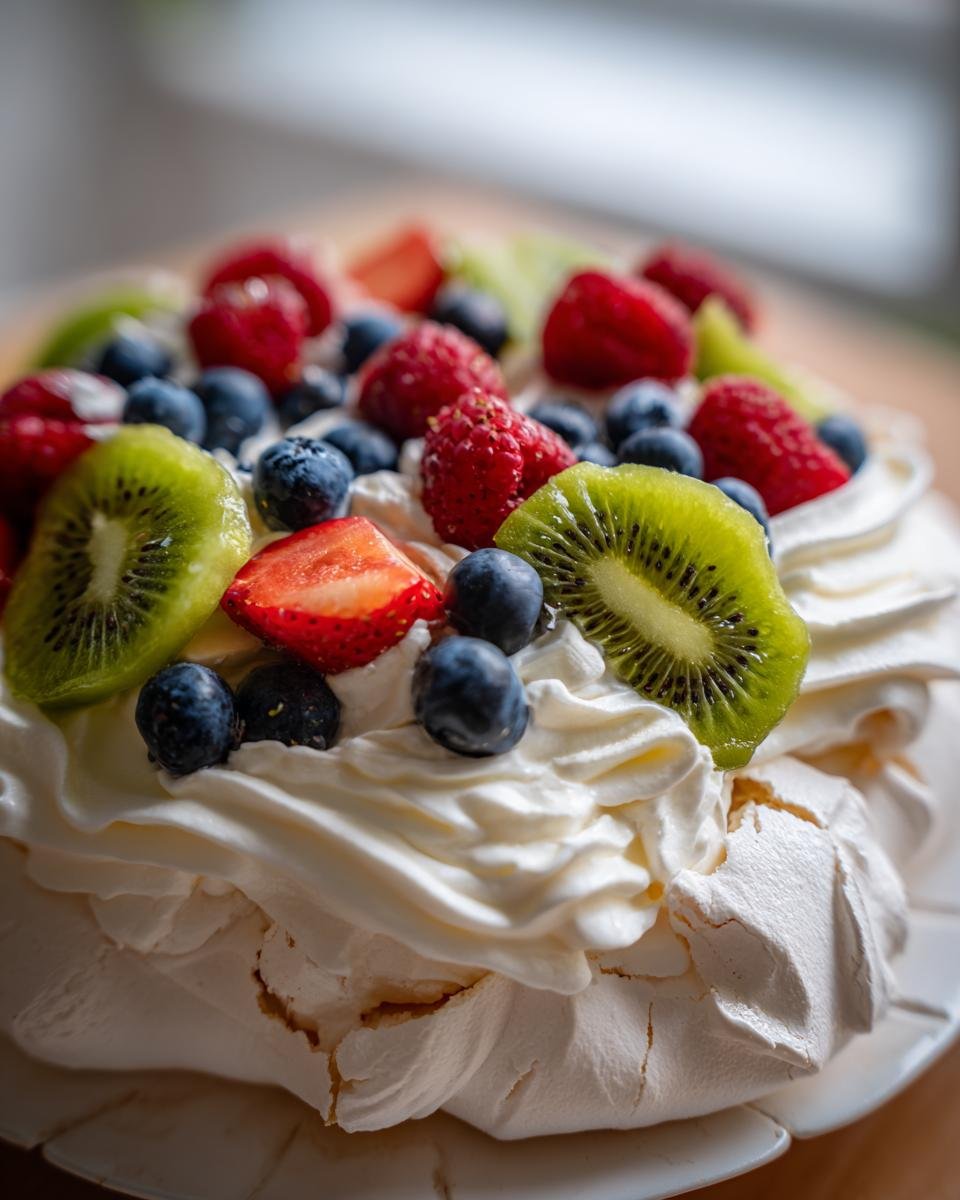
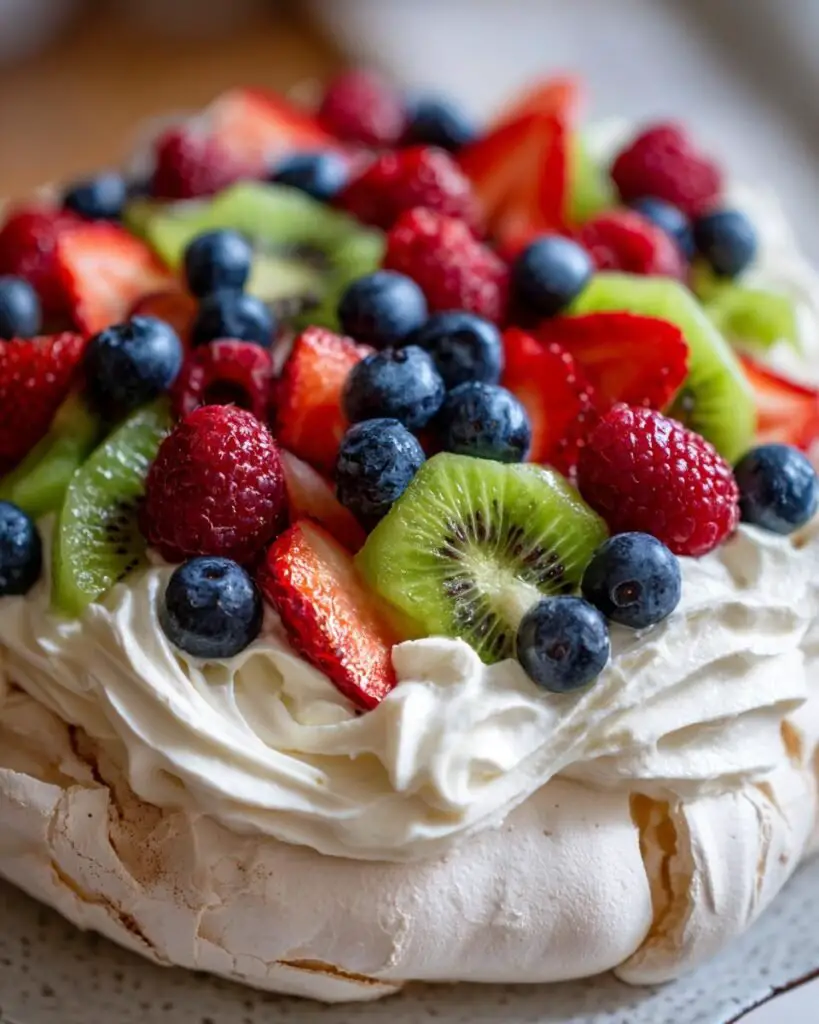
Oh, let me tell you about my favorite dessert that’s taken many family gatherings to a whole new level: the Pavlova Recipe! This delightful masterpiece is a light and airy meringue dessert that feels like a cloud in your mouth. I can’t help but smile every time I whip it up because it’s not just a treat; it’s an experience that brings everyone together. The crisp outer shell contrasts beautifully with the soft, marshmallow-like center, and when you top it off with whipped cream and fresh fruit, it’s like a celebration in every bite!
Perfect for birthdays, holidays, or just because you want to impress your friends, this Pavlova is sure to be a showstopper. Trust me, once you make it, you’ll be hooked on its elegance and simplicity. It’s a dessert that says, “Let’s celebrate life!” So, roll up your sleeves and let’s get started on this incredible journey of creating the best Pavlova ever!
Ingredients List
Gathering the right ingredients is key to making the perfect Pavlova. Here’s what you’ll need:
- 6 large egg whites, room temperature
- 1.5 cups granulated sugar
- 2 tsp corn starch
- 1/2 Tbsp lemon juice
- 1/2 Tbsp vanilla extract
- 1 1/2 cups heavy whipping cream, very cold
- 2 tbsp granulated sugar (for the whipped cream)
- 4-5 cups fresh fruit (like blueberries, kiwi, raspberries, and sliced strawberries)
- 15 mint leaves, for garnish (optional)
Make sure your eggs are at room temperature for the best results, and don’t skimp on the fresh fruit. It adds that vibrant touch that makes your Pavlova truly shine!
How to Prepare the Pavlova Recipe
Now that we’ve gathered all our ingredients, it’s time to dive into the magic of creating this Pavlova! I promise, the process is as satisfying as the end result. Just follow these steps carefully, and you’ll be well on your way to impressing everyone!
Step-by-Step Instructions
1. **Preheat your oven**: First things first, you’ll want to preheat your oven to 225˚ F. This low temperature is crucial for creating that perfect melt-in-your-mouth meringue. While the oven is heating up, line a large 3/4 baking sheet with parchment paper. You can also use two regular baking sheets if that’s what you have – just make sure they’re lined too!
2. **Whip the egg whites**: In a clean mixing bowl, beat the 6 large egg whites on high speed for about 1 minute until you see soft peaks forming. It’s a beautiful sight! Now, gradually add in the 1.5 cups of granulated sugar. This part is key – take your time! Whip the mixture on high speed for about 10 minutes until those stiff peaks form. You want your meringue to look glossy and hold its shape perfectly.
3. **Add the flavor**: Once the sugar is fully incorporated, gently fold in 1/2 tablespoon of lemon juice and 1/2 tablespoon of vanilla extract. This will give your Pavlova a lovely flavor. Next, fold in the 2 teaspoons of corn starch until everything is well blended. Be gentle here – we don’t want to deflate all that lovely air you just whipped in!
4. **Shape the meringue**: Now for the fun part! Using a piping bag or a spoon, pipe the meringue into nests that are about 3 to 3.5 inches wide on the parchment paper. Make sure to create a little indent in the center with a spoon – this is where all the delicious whipped cream and fruit will go later!
5. **Bake the meringue**: Pop your baking sheet in the preheated oven and bake for 1 hour and 15 minutes. This low and slow method will create that signature crispy outer shell while keeping the inside soft and marshmallowy. Once the time is up, turn off the oven and let the meringue sit in the oven with the door slightly ajar for another 30 minutes. This resting time is crucial for avoiding cracks!
6. **Cool down**: After that, carefully transfer the Pavlova to the counter or a cookie rack to cool completely to room temperature. This step is important – don’t rush it! You want to give your Pavlova the time it needs to cool down and set perfectly.
7. **Whip the cream**: In a large, cold mixing bowl, combine the 1.5 cups of heavy whipping cream with the 2 tablespoons of granulated sugar. Beat on high speed for about 2 to 2.5 minutes until the cream is whipped and spreadable. It should hold its shape but still be light and fluffy!
8. **Assemble the Pavlova**: Finally, pipe or spread that luscious whipped cream onto your cooled meringue nests. Top with a beautiful selection of fresh fruit, and if you’re feeling fancy, garnish with mint leaves. Ta-da! You’ve just created a Pavlova that’s not only delicious but a feast for the eyes!
And there you have it! Each step might seem small, but they all come together to create something truly spectacular. Enjoy the process, and don’t forget to sneak a taste of that whipped cream – it’s irresistible!
Why You’ll Love This Pavlova Recipe
- Light and Airy Delight: This Pavlova is the perfect dessert for those who crave something sweet yet feel guilty after indulging. Its fluffy texture lets you enjoy every bite without feeling weighed down!
- Quick and Easy: With just a handful of ingredients and straightforward steps, you can whip up this stunning dessert in no time. It’s perfect for last-minute gatherings or spontaneous celebrations!
- Customizable Toppings: The beauty of Pavlova lies in its versatility. Top it with your favorite fresh fruits, chocolates, or even a drizzle of caramel. It’s a blank canvas that allows you to express your creativity!
- Crowd-Pleaser: Trust me, everyone loves Pavlova! It’s always a hit at parties and family get-togethers, making it a reliable choice that will impress your guests time and again.
- Perfect for Any Occasion: Whether it’s a birthday, holiday, or a casual get-together, this Pavlova fits right in. It brings a touch of elegance and charm to any table!
So, go ahead and make this Pavlova recipe your go-to dessert. You won’t regret it, and your friends and family will thank you for it!
Tips for Success with Your Pavlova Recipe
Creating the perfect Pavlova is an art, and I’ve gathered some pro tips to help you nail it every single time! Follow these nuggets of wisdom, and you’ll impress everyone with your meringue-making skills.
Achieving the Right Meringue Texture
First things first, the texture of your meringue is everything! Make sure your mixing bowl and beaters are squeaky clean. Any grease can prevent your egg whites from whipping up to their full potential. I like to wipe them down with a little vinegar or lemon juice to be safe – it works wonders!
When whipping your egg whites, be patient and let the peaks form slowly. Soft peaks signal that you’re on the right track, but it’s the stiff peaks you’re aiming for. They should be glossy and hold their shape without any drooping. Keep an eye on it, and don’t rush this step!
Temperature Control is Key
As you bake your meringue, remember that low and slow is the name of the game. The 225˚ F temperature is crucial for that delightful crisp exterior while keeping the inside soft. If your oven runs hot, consider using an oven thermometer to ensure accuracy – it’s a little secret I swear by!
Storing Your Meringue
Humidity can be the nemesis of your beautiful Pavlova, so I suggest storing the meringue loosely wrapped on the counter if you have leftovers. Avoid the fridge; it can make them weep and lose that lovely crunch! They can last up to three days, but trust me, they’re best enjoyed fresh.
If you’re making whipped cream in advance, feel free to store it in an airtight container in the fridge for up to 2-3 days. Just give it a quick re-whip before spreading it on your Pavlova to restore its fluffiness!
Assembling with Care
When it comes time to assemble your Pavlova, don’t do it too far in advance. The meringue can start to soften when topped with whipped cream, so I recommend assembling it no more than 4 hours before serving. This ensures that you get that delightful contrast of textures – crispy on the outside and soft on the inside!
By keeping these tips in mind, you’ll be well on your way to creating a Pavlova that will wow your family and friends. Happy baking! You’ve got this!
Nutritional Information Disclaimer
While I’ve provided some helpful nutritional information for the Pavlova recipe, please keep in mind that these values can vary based on the specific ingredients and brands you use. Factors like the type of fruit or cream can change the calorie count and other nutritional aspects quite a bit. So, consider this information as a general guideline rather than an exact measurement. It’s always a good idea to check the labels of your ingredients for the most accurate nutritional data!
FAQ Section
Got some questions about making the perfect Pavlova? Don’t worry, I’ve got you covered! Here are some common queries that pop up when people dive into this delightful meringue dessert:
Can I make Pavlova in advance?
Absolutely! You can make the meringue up to three days in advance. Just store it loosely wrapped on the counter to keep that lovely crispness. The whipped cream can be made a couple of days ahead too; just keep it in an airtight container in the fridge. However, it’s best to assemble the Pavlova no more than four hours before serving to maintain that delightful texture!
What fruits work best for topping my Pavlova?
Oh, the possibilities are endless! I love using fresh fruits like blueberries, kiwi, raspberries, and sliced strawberries. They not only add beautiful color but also a burst of freshness that complements the sweetness of the meringue. You can mix and match your favorites or even add a drizzle of chocolate or caramel for an extra indulgent touch!
Why is my meringue cracking?
Cracking can happen for a few reasons, but the most common culprits are temperature and baking time. Make sure to bake your Pavlova at a low temperature (225˚ F) and allow it to cool slowly in the oven with the door slightly ajar. This resting time is crucial for preventing cracks. If you notice cracks forming while baking, don’t panic; they can still taste amazing!
Is there a difference between Pavlova and meringue?
Great question! While both Pavlova and meringue are made from whipped egg whites and sugar, Pavlova is typically larger and has a soft, marshmallow-like interior with a crisp outer shell. Meringue, on the other hand, can be lighter and is often used for different desserts or as a topping. Pavlova is all about that delightful contrast in texture!
Can I use an electric mixer for whipping egg whites?
Definitely! An electric mixer is your best friend when it comes to whipping egg whites. It saves time and ensures you get those stiff peaks more easily. Just be sure to use a clean bowl and beaters, as any grease can interfere with the whipping process. Oh, and keep an eye on it – you don’t want to overbeat and end up with dry meringue!
Serving Suggestions for Pavlova
Now that you’ve created your stunning Pavlova, you might be wondering what to serve with it for that perfect dessert experience. Let me share some delightful ideas that will elevate your Pavlova to new heights!
- Fresh Fruit Medley: While your Pavlova already shines with fresh fruit on top, consider serving some extra fruit on the side. A colorful fruit salad with a mix of berries, kiwi, and even some citrus segments adds a refreshing touch that complements the sweetness.
- Drizzle of Sauce: A light drizzle of raspberry or passion fruit sauce can add a burst of flavor and a beautiful presentation. You can easily make this by blending fresh fruit with a bit of sugar and straining it for a smooth finish.
- Chocolate Shavings: For the chocolate lovers out there, topping your Pavlova with some dark chocolate shavings or a sprinkle of cocoa powder can add a decadent twist that balances the sweetness perfectly.
- Whipped Cream Variations: Switch things up by infusing your whipped cream with flavors! Try adding a splash of almond extract or a hint of orange zest for a delightful surprise. You can even use flavored whipped cream like coconut or vanilla bean!
- Pair with Tea or Coffee: Serving your Pavlova alongside a nice cup of tea or coffee creates a lovely contrast. The warmth of the beverage complements the lightness of the dessert beautifully. Think of a fragrant Earl Grey or a rich espresso!
With these serving suggestions, your Pavlova will not only look spectacular but also taste absolutely divine! Remember, the best part about dessert is sharing it with loved ones, so don’t forget to enjoy every moment together. Happy indulging!
Storage & Reheating Instructions
Now that you’ve whipped up this stunning Pavlova, it’s important to know how to store any leftovers properly to maintain that delightful texture. Trust me, you want every last bite to taste as amazing as when you first made it!
If you have any leftover meringue, store it loosely wrapped at room temperature. Avoid putting it in the fridge, as humidity can cause it to weep and lose that wonderful crispness. It should stay fresh for up to three days, but I have a feeling it won’t last that long!
As for the whipped cream, it can be stored in an airtight container in the fridge for about 2-3 days. Just give it a quick re-whip before using it again to restore that light and fluffy texture.
When it comes time to serve your Pavlova again, it’s best to assemble it fresh if you can. If you need to store an assembled Pavlova, know that it’s best enjoyed within four hours of topping it with whipped cream and fruit. After that, the meringue can start to soften, losing that lovely contrast of textures.
So, if you can, keep the meringue and toppings separate until you’re ready to indulge again. With these simple storage tips, you’ll ensure your Pavlova remains a light, airy delight that everyone loves! Happy storing!
For more recipes follow me in page Pinterest.
Print
Pavlova Recipe: 7 Reasons You’ll Fall in Love Today
- Total Time: 1 hour 45 minutes
- Yield: 15 pavlovas 1x
- Diet: Vegetarian
Description
A light and airy dessert made with meringue, topped with whipped cream and fresh fruit.
Ingredients
- 6 large egg whites, room temperature
- 1.5 cups granulated sugar
- 2 tsp corn starch
- 1/2 Tbsp lemon juice
- 1/2 Tbsp vanilla extract
- 1 1/2 cups heavy whipping cream, very cold
- 2 tbsp granulated sugar
- 4–5 cups fresh fruit, blueberries, kiwi, raspberries, sliced strawberries, etc.
- 15 mint leaves, for garnish, optional
Instructions
- Preheat the Oven to 225˚ F. Line a large 3/4 baking sheet with parchment paper.
- Beat 6 egg whites on high speed for 1 minute until soft peaks form. Gradually add 1.5 cups sugar and beat for 10 minutes on high speed until stiff peaks form.
- Fold in 1/2 Tbsp lemon juice and 1/2 Tbsp vanilla extract, then fold in 2 tsp corn starch until well blended.
- Pipe meringue into 3 to 3.5 inches wide nests on parchment paper. Indent the center with a spoon. Bake at 225˚ for 1 hour and 15 minutes, then turn off the oven and let meringue sit for another 30 minutes.
- Transfer pavlova to the counter or a cookie rack to cool to room temperature.
- In a large, cold mixing bowl, combine cold whipping cream with 2 Tbsp sugar and beat on high speed for 2 to 2.5 minutes until whipped and spreadable.
- Pipe frosting onto the pavlova and top with fresh fruit or desired toppings.
Notes
- If you don’t have a 3/4 XL baking sheet, use 2 regular baking sheets and bake on 2 racks.
- Store meringue loosely wrapped on the counter for up to 3 days.
- Avoid humidity when storing meringue.
- Make whipped cream 2-3 days in advance, storing it in an airtight container in the fridge.
- Assembled pavlova should be eaten within 4 hours.
- Prep Time: 30 minutes
- Cook Time: 1 hour 15 minutes
- Category: Dessert
- Method: Baking
- Cuisine: Australian
Nutrition
- Serving Size: 1 pavlova
- Calories: 210
- Sugar: 24g
- Sodium: 40mg
- Fat: 9g
- Saturated Fat: 5g
- Unsaturated Fat: 4g
- Trans Fat: 0g
- Carbohydrates: 32g
- Fiber: 1g
- Protein: 2g
- Cholesterol: 0mg
Keywords: Pavlova Recipe, meringue dessert, fruit dessert