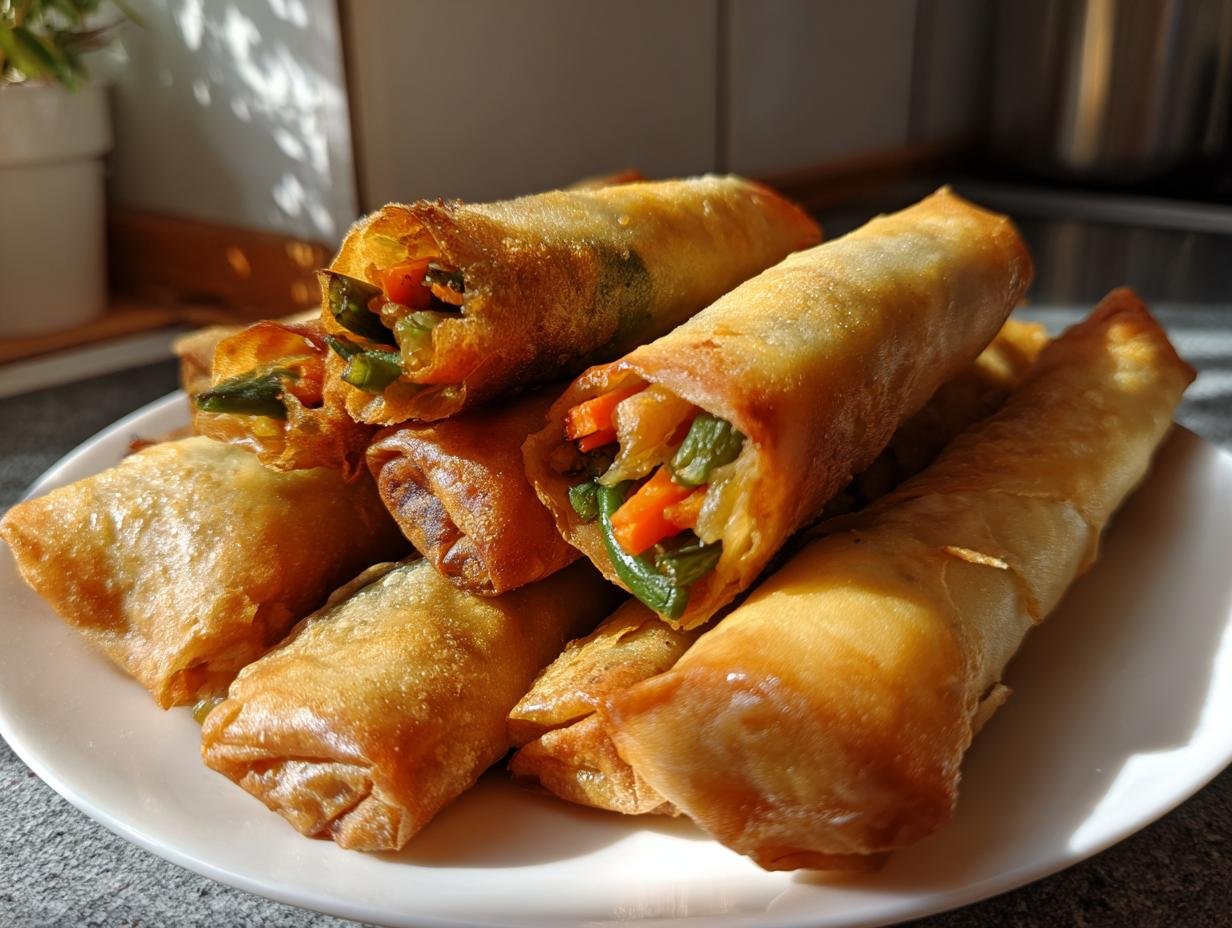
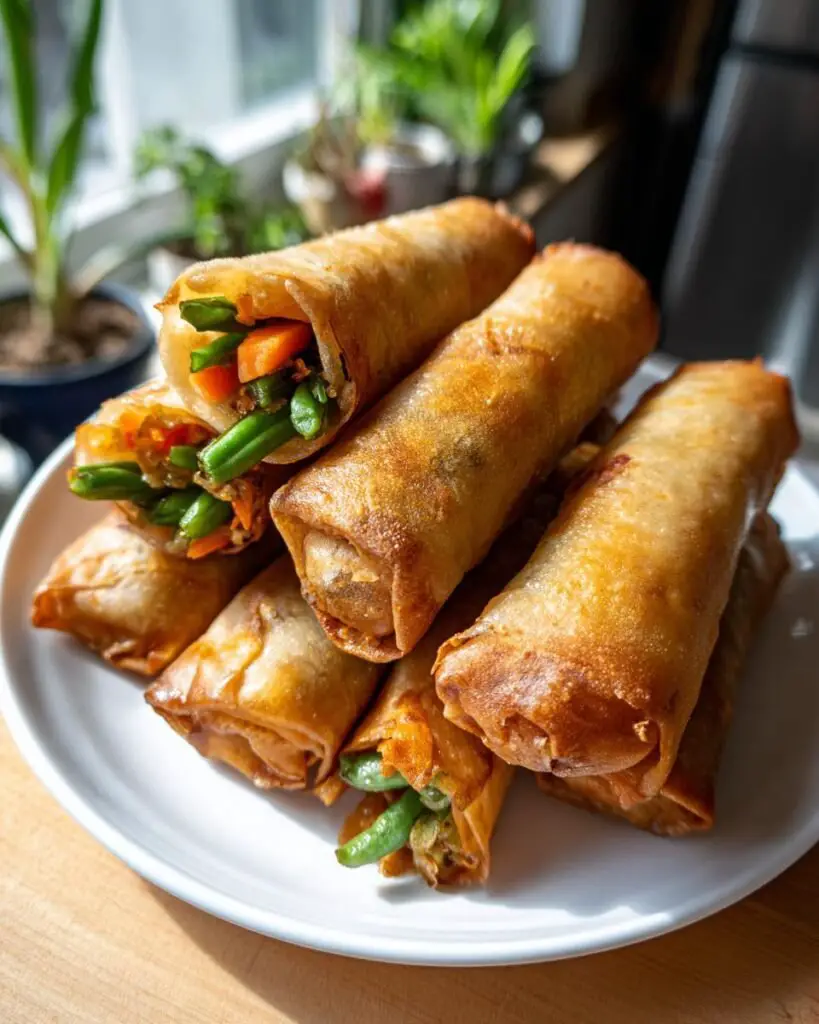
Ah, traditional Filipino lumpia! This delightful dish is more than just a snack; it’s a symbol of celebration, family gatherings, and the rich tapestry of Filipino culture. I can’t tell you how many times I’ve stood in my kitchen, excitedly wrapping these savory spring rolls, remembering the joy they bring to any occasion. The crispy, golden exterior that gives way to a savory filling of pork and vegetables is a texture and flavor explosion that never fails to impress.
Whether it’s a festive occasion or just a regular Sunday dinner, lumpia steals the show every time. The sweet aroma wafting through the kitchen while they fry is enough to make anyone’s mouth water. And trust me, once you take that first bite, you’ll be hooked! These little wonders are so versatile, too – perfect as an appetizer or even as a main dish. Plus, they’re gluten-free! So, get ready to dive into the world of traditional Filipino lumpia, and let’s create some delicious memories together.
Ingredients for Traditional Filipino Lumpia
Gathering the right ingredients is key to making the best traditional Filipino lumpia. Here’s what you’ll need:
- 1 lb ground pork
- 1 cup carrots, grated
- 1 cup green beans, finely chopped
- 1/2 cup onions, finely chopped
- 2 cloves garlic, minced
- 1/2 tsp salt
- 1/2 tsp pepper
- 1 pack lumpia wrappers
- Oil for frying
Make sure to have everything prepped and ready before you start wrapping. Fresh ingredients really make a difference, so try to use the best quality pork and vibrant veggies. Trust me, you’ll taste the love in every bite!
How to Prepare Traditional Filipino Lumpia
Now that we’ve got all our ingredients lined up, let’s dive into the fun part: making those delicious traditional Filipino lumpia! I promise, the process is as enjoyable as the final result. Just follow these easy steps, and soon you’ll be savoring your homemade spring rolls!
Mixing the Filling
First things first, we need to create that mouthwatering filling that makes lumpia so special. In a large mixing bowl, combine your ground pork, grated carrots, finely chopped green beans, onions, minced garlic, salt, and pepper. I like to use my hands for this part – it feels more personal and allows me to really mix everything together well. You want to ensure every bit of that savory goodness is evenly distributed. You’ll know it’s ready when the mixture looks well-blended and colorful. Take a moment to appreciate how vibrant it looks – that’s the magic of fresh ingredients!
Wrapping the Lumpia
Alright, it’s time to wrap! Lay a lumpia wrapper flat on a clean surface or cutting board with one corner pointing towards you – think of it like a diamond shape. Spoon about a tablespoon of the filling into the center, making sure not to overstuff (trust me, this is crucial!). Fold the bottom corner over the filling, then fold in the sides, and roll tightly towards the top corner. Before sealing the edge, dip your finger in a bit of water and run it along the edge of the wrapper. This helps it stick together beautifully. Repeat this process until you’ve wrapped all your filling – it’s like a fun little assembly line!
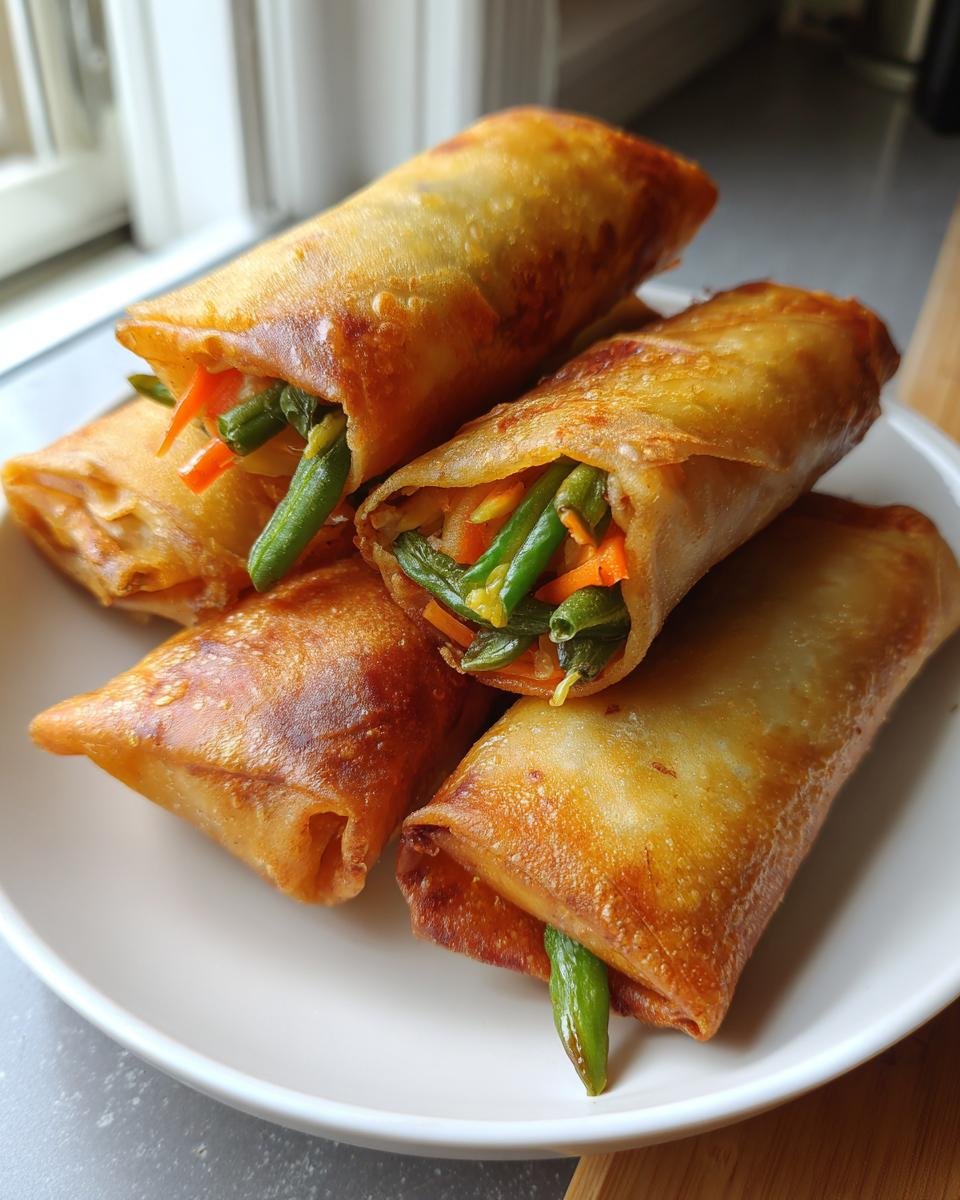
Frying the Lumpia
Now, onto the frying! Heat a generous amount of oil in a deep pan or skillet over medium heat. You’ll want enough oil to submerge the lumpia halfway. To test if the oil is hot enough, drop a small piece of wrapper into the oil – if it sizzles, you’re ready to go! Carefully place a few lumpia in the oil, making sure not to overcrowd the pan (about 5-6 at a time is perfect). Fry them for about 3-4 minutes on each side, or until they’re golden brown and crispy. You’ll know they’re done when they look absolutely irresistible! Once fried, place them on paper towels to drain any excess oil. And just like that, your traditional Filipino lumpia is ready to steal the show!
Tips for Success with Traditional Filipino Lumpia
Making traditional Filipino lumpia is a delightful experience, but let me share some of my favorite tips to ensure everything turns out perfectly. Trust me, these little insights can make a world of difference in your cooking adventure!
Choose the Right Wrappers
Not all lumpia wrappers are created equal! Look for the thin, crispy varieties in the freezer section of your local Asian market. They should be pliable and easy to work with. If they’re too dry or brittle, you’ll have a tough time wrapping them. If you can, thaw them properly before using – about 30 minutes at room temperature usually does the trick.
Don’t Overstuff
This is crucial! I know it’s tempting to pile on the filling, but overstuffed lumpia can burst while frying. Stick to about a tablespoon of filling per wrapper. You want them to be full but not bursting at the seams. Remember, the wrapping process is part of the fun!
Seal Them Tight
Make sure to seal those edges well! After moistening the edge with water, press gently to ensure a tight seal. If they’re not sealed properly, they might open up during frying, and we definitely don’t want that! Take your time with this step; it’s worth it for a beautiful presentation.
Control the Temperature
Oil temperature is key for that perfect crunch! If the oil isn’t hot enough, the lumpia will soak up too much oil and become greasy. If it’s too hot, they’ll burn on the outside while remaining raw inside. A medium heat is usually perfect, but keep an eye on them. You can always adjust the heat as needed. And remember, patience is a virtue here!
Fry in Batches
Don’t overcrowd the pan! Frying in small batches ensures that each lumpia gets that beautiful golden brown color without steaming each other. About 5-6 at a time is ideal. Plus, it gives you time to admire your handiwork before they disappear!
Drain Properly
After frying, let your lumpia rest on paper towels to drain any excess oil. This little step makes a huge difference in keeping them crispy. You want that crunch when you take a bite – no one likes a soggy lumpia!
With these tips in your back pocket, you’ll be well on your way to creating the most delightful traditional Filipino lumpia that your family and friends will rave about. Happy cooking, and enjoy every crispy, savory bite!
Nutritional Information Disclaimer
When it comes to enjoying traditional Filipino lumpia, it’s important to keep in mind that nutritional values can vary quite a bit based on the specific ingredients and brands you choose. While I’ve provided some general nutritional information for a serving of lumpia, these figures are estimates and may not reflect your final dish perfectly.
Each ingredient can have its own unique nutritional profile, so feel free to adjust based on your preferences or dietary needs. For instance, using leaner cuts of pork or adding more vegetables can change the calorie count and nutrient balance. Remember, the joy of cooking lies in making it your own, so don’t stress too much about the numbers! Focus on the flavors, and enjoy every delicious bite!
Why You’ll Love This Recipe
Oh, where do I even begin? You’re going to absolutely love making traditional Filipino lumpia for so many reasons! First off, the flavor is just out of this world. Imagine biting into that crispy, golden shell and experiencing the savory goodness of the filling bursting with fresh vegetables and tender pork. Each bite is a delightful adventure for your taste buds!
Another reason you’ll adore this recipe is its ease of preparation. Seriously, once you get the hang of wrapping those little bundles of joy, it becomes a rhythm that’s almost meditative. Plus, you can prepare the filling ahead of time, making it a perfect go-to dish for busy weeknights or last-minute gatherings.
And let’s talk about gatherings! Traditional Filipino lumpia is a crowd-pleaser. Whether it’s a family picnic, a birthday party, or just a cozy get-together with friends, these spring rolls will steal the spotlight. They’re easy to serve, fun to eat, and everyone can enjoy them – they’re gluten-free, after all!
In a nutshell, making lumpia is not just about cooking; it’s about creating memories, sharing joy, and bringing people together. So roll up your sleeves and get ready to impress your loved ones with this incredible dish. Trust me, they’ll be coming back for seconds (and maybe even thirds)!
Serving Suggestions for Traditional Filipino Lumpia
Now that your traditional Filipino lumpia is ready to shine, let’s talk about how to serve it up for maximum enjoyment! These crispy delights are fantastic on their own, but pairing them with the right accompaniments can take your dining experience to a whole new level.
First up, you absolutely can’t go wrong with a classic sweet and sour sauce. The tangy, fruity notes beautifully complement the savory filling of the lumpia. Just dip and enjoy – it’s a match made in culinary heaven!
If you’re feeling a bit adventurous, try serving them with a side of spicy vinegar. A simple mix of vinegar, chopped chili peppers, and garlic creates a zesty dip that adds a kick to every bite. Trust me, this combo will have your taste buds dancing!
For a heartier meal, serve your lumpia alongside a refreshing Asian salad loaded with crunchy vegetables, sesame seeds, and a light dressing. The freshness of the salad perfectly balances the richness of the fried lumpia, creating a delightful contrast.
And don’t forget about drinks! A chilled calamansi juice or a crisp iced tea pairs wonderfully with lumpia, enhancing the overall experience with a refreshing sip between bites.
Lastly, if you’re making this for a gathering, consider creating a little lumpia bar where guests can choose their favorite dips and sides. It’s interactive, fun, and a surefire way to make your lumpia the star of the show!
With these serving suggestions, your traditional Filipino lumpia will not only taste amazing but will also make for a memorable dining experience that everyone will rave about. So go ahead, get creative, and enjoy every delicious bite!
Storage & Reheating Instructions
Now that you’ve whipped up a fabulous batch of traditional Filipino lumpia, you’ll want to know how to store those delicious leftovers (if there are any!). Proper storage not only preserves the taste but also keeps that crispy texture intact for when you’re ready to enjoy them again.
First, let’s talk storage. If you have leftover lumpia, let them cool completely at room temperature before storing. Once cooled, place them in an airtight container or a resealable plastic bag. Make sure to layer them with parchment paper in between to prevent sticking. This way, they’ll stay fresh and ready for their next appearance!
You can store your lumpia in the refrigerator for up to 3-4 days. If you want to keep them longer, I recommend freezing them! To freeze, arrange the lumpia in a single layer on a baking sheet and pop them in the freezer for about an hour until they’re firm. Then transfer them to a freezer-safe container or bag, and they’ll be good for up to 2-3 months. When you’re ready to fry them, there’s no need to thaw – just go straight to the frying pan!
Now, let’s discuss reheating. If you’re reheating lumpia that’s been stored in the fridge, preheat your oven to 350°F (175°C). Arrange the lumpia on a baking sheet and bake for about 10-15 minutes, or until they’re heated through and crispy again. If you prefer to use an air fryer, just pop them in at the same temperature for about 5-7 minutes!
For frozen lumpia, you can also use the oven or air fryer method, but you’ll need to extend the cooking time slightly. Just keep an eye on them until they’re golden brown and piping hot. And whatever you do, avoid the microwave – it’ll leave your lovely lumpia soggy, and we definitely don’t want that!
With these simple storage and reheating tips, you’ll always have crispy, savory traditional Filipino lumpia at your fingertips, ready to delight your taste buds whenever you crave them. Enjoy every crunchy bite, my friend!
FAQ About Traditional Filipino Lumpia
Got questions about making traditional Filipino lumpia? Don’t worry, I’ve got you covered! Below are some common queries I often hear, along with my best answers to help you on your culinary adventure.
Can I use different meats for the filling?
Absolutely! While ground pork is the classic choice, feel free to experiment. Ground chicken, turkey, or even a mix of seafood can work beautifully. Just keep in mind that the flavor and texture will vary, so adjust your seasonings accordingly. The beauty of lumpia is its versatility!
What if I can’t find lumpia wrappers?
If you’re in a pinch and can’t find lumpia wrappers, don’t fret! You can use spring roll wrappers as a substitute. Just make sure to adjust the cooking time since they may fry differently. Alternatively, you could try making your own wrappers at home if you’re feeling adventurous!
Can I bake lumpia instead of frying?
Yes, you can definitely bake lumpia for a lighter option! Preheat your oven to 400°F (200°C), brush the lumpia with a bit of oil, and bake them on a parchment-lined baking sheet for about 15-20 minutes or until golden and crisp. They may not be quite as crispy as fried lumpia, but they’ll still be delicious!
How do I make lumpia vegetarian?
Making vegetarian lumpia is super easy! Simply replace the ground pork with a mix of finely chopped vegetables, such as mushrooms, bell peppers, and more carrots or green beans. You can also add tofu for extra protein. Season it up the same way, and you’ll have a vibrant, veggie-packed filling that’s just as satisfying!
Can I prepare lumpia ahead of time?
Yes! You can prepare the filling and wrap the lumpia ahead of time. Just keep them covered with a damp cloth to prevent them from drying out. If you want to freeze them, lay them flat on a baking sheet first, freeze until solid, then transfer to a freezer bag. They can be fried straight from the freezer whenever you’re ready!
What’s the best way to serve lumpia?
Traditional Filipino lumpia is often served with a side of sweet and sour sauce, but you can also try it with spicy vinegar or a zesty dipping sauce of your choice. Pairing them with a refreshing salad or some fried rice makes for a complete meal that everyone will love!
If you have any more questions or need extra tips, feel free to drop me a message! I’m here to help you make the most amazing traditional Filipino lumpia possible. Enjoy your cooking journey!
For more recipes follow me in page Pinterest.
Print
Traditional Filipino Lumpia: 7 Tips for Irresistible Flavor
- Total Time: 45 minutes
- Yield: 20 pieces 1x
- Diet: Gluten Free
Description
Traditional Filipino spring rolls filled with savory ingredients.
Ingredients
- 1 lb ground pork
- 1 cup carrots, grated
- 1 cup green beans, finely chopped
- 1/2 cup onions, finely chopped
- 2 cloves garlic, minced
- 1/2 tsp salt
- 1/2 tsp pepper
- 1 pack lumpia wrappers
- Oil for frying
Instructions
- In a bowl, mix ground pork, carrots, green beans, onions, garlic, salt, and pepper.
- Lay a lumpia wrapper flat and place a tablespoon of the mixture in the center.
- Fold the sides of the wrapper over the filling and roll tightly.
- Seal the edge with water.
- Heat oil in a pan over medium heat.
- Fry the lumpia until golden brown on all sides.
- Drain on paper towels and serve hot.
Notes
- Serve with sweet and sour sauce.
- Can be frozen before frying for later use.
- Adjust filling ingredients to your preference.
- Prep Time: 30 minutes
- Cook Time: 15 minutes
- Category: Appetizer
- Method: Frying
- Cuisine: Filipino
Nutrition
- Serving Size: 1 piece
- Calories: 120
- Sugar: 1g
- Sodium: 200mg
- Fat: 7g
- Saturated Fat: 2g
- Unsaturated Fat: 3g
- Trans Fat: 0g
- Carbohydrates: 10g
- Fiber: 1g
- Protein: 5g
- Cholesterol: 30mg
Keywords: traditional filipino lumpia