
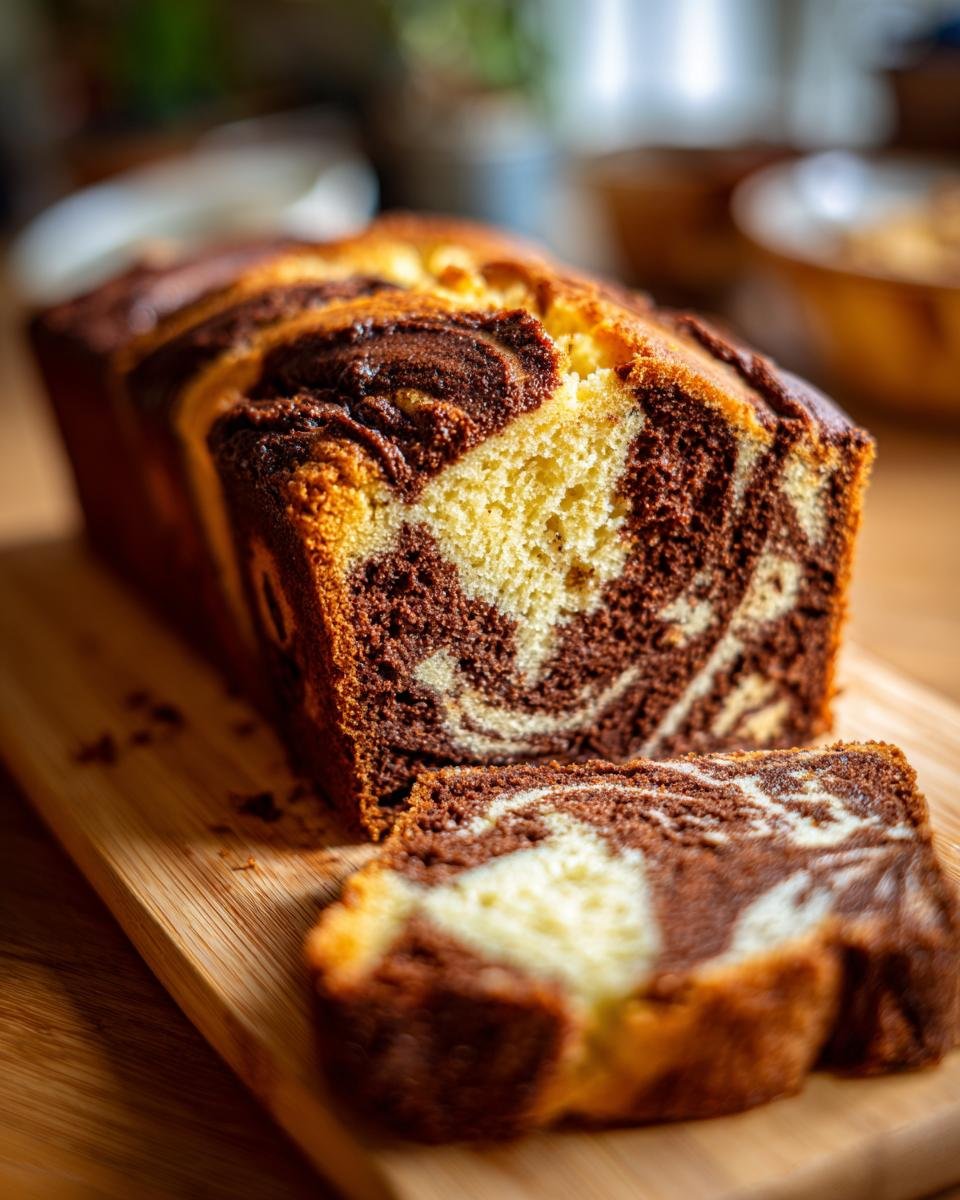
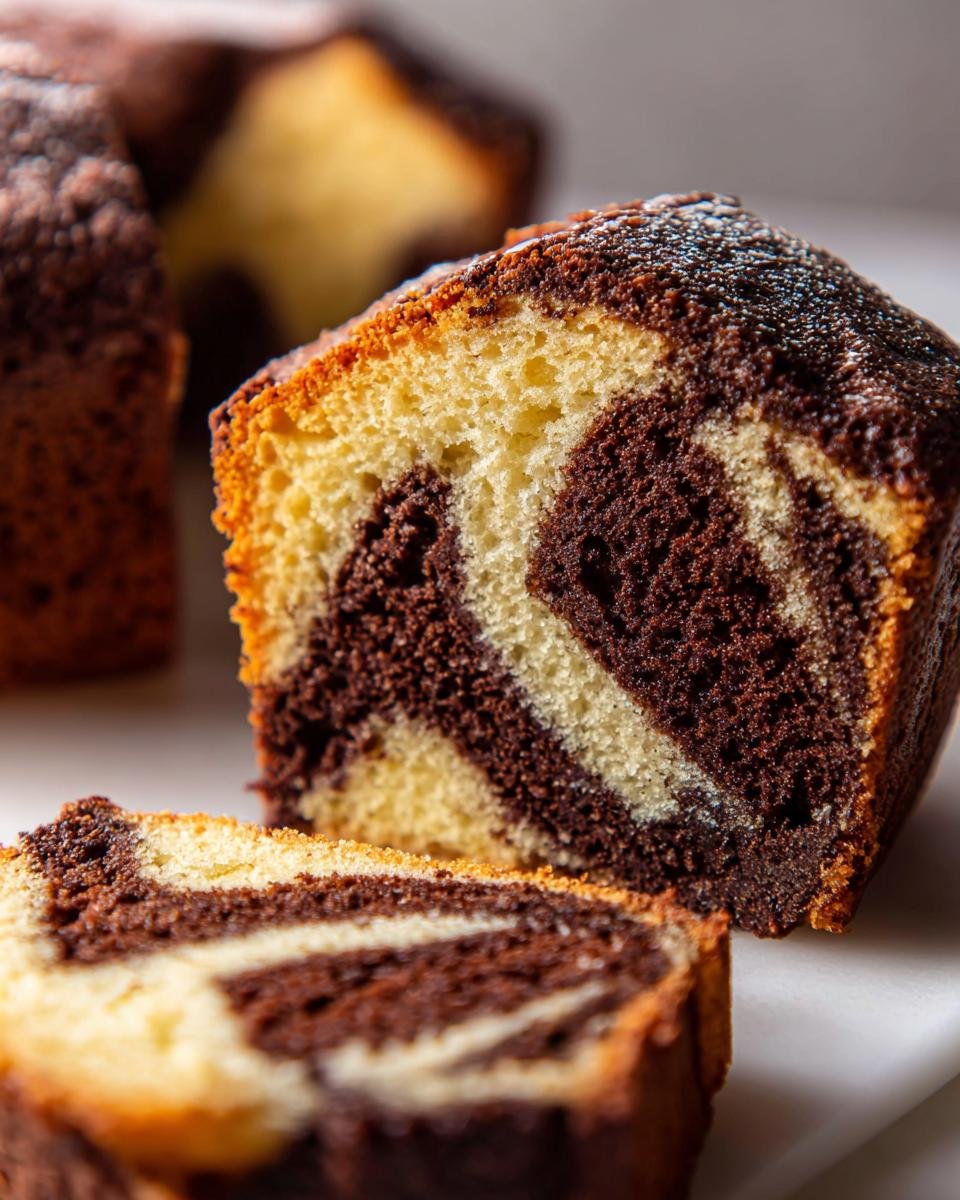
Oh, let me tell you about Marble Pound Cake! This delightful dessert is like a warm hug on a plate, with its perfect blend of rich chocolate and smooth vanilla flavors. It’s a cake that captures the heart with its moist texture and stunning marbled appearance. I remember the first time I baked this for my family; I was a little nervous, but as soon as I pulled it out of the oven, the aroma filled the kitchen, and I knew I had created something special. My kids couldn’t wait to dig in, and the looks on their faces when they took that first bite were priceless. It’s become a staple in our home for birthdays, cozy evenings, and just because. The beauty of Marble Pound Cake is that it’s simple yet elegant, making it perfect for any occasion, whether it’s a casual family gathering or a fancy tea party. Trust me, once you try this recipe, you’ll want to keep it close and share it with everyone you know!
Ingredients for Marble Pound Cake
Gathering the right ingredients is the first step to creating your perfect Marble Pound Cake. Here’s what you’ll need:
- 2 cups flour: Make sure it’s all-purpose flour for the best texture.
- 2 teaspoons baking powder: This helps the cake rise beautifully, giving it that lovely lightness.
- 1/4 teaspoon salt: Just a pinch to enhance all those sweet flavors.
- 15 tablespoons unsalted butter, softened and divided: You’ll use some for the batter and some for mixing with cocoa. Make sure it’s nice and soft for easy creaming!
- 4 tablespoons unsweetened cocoa powder: This is what adds that rich chocolate flavor to half of your batter.
- 1 1/3 cups sugar: Sweetness is key here, so don’t skimp on the sugar!
- 3 large eggs: They help bind everything together and add moisture.
- 1 teaspoon vanilla extract: A must-have for that warm, inviting flavor.
- 1/2 cup whole milk: This adds richness and helps keep the cake moist.
Having these ingredients ready will make the whole baking process a breeze, so take a moment to measure them out before you dive in!
How to Prepare Marble Pound Cake
Now that you’ve got your ingredients ready, let’s dive into the steps to create this beautiful Marble Pound Cake! Trust me, it’s easier than you think, and I’m here to guide you through each one.
Preheat and Prepare Your Pan
First things first, you’ll want to preheat your oven to 350 degrees Fahrenheit. While that’s warming up, grab your 9 by 5 inch loaf pan. Grease it well with butter, making sure to cover all the corners, then line the bottom with parchment paper for extra insurance against sticking. Oh, and don’t forget to grease the parchment paper too! This little step makes a world of difference when it comes time to remove your cake.
Combine Cocoa and Butter
Next, let’s work on that delicious chocolate layer! In a microwave-safe bowl, melt 3 tablespoons of your softened butter. I usually do this in 30-second increments, stirring in between until it’s smooth and fully melted. Once melted, whisk in the 4 tablespoons of unsweetened cocoa powder until you have a rich, velvety mixture. This chocolate goodness will be the star of your marble effect!
Mix Dry Ingredients
In another bowl, combine 2 cups of flour, 2 teaspoons of baking powder, and 1/4 teaspoon of salt. This mixture is key for giving your cake that lovely rise and fluffy texture. Give it a good stir with a whisk to make sure everything’s evenly blended. It’s a simple step, but it really sets the foundation for your cake!
Cream Butter and Sugar
Now, let’s get mixing! In your mixer, combine the remaining 12 tablespoons of softened butter with 1 1/3 cups of sugar. Beat them together until it’s light and fluffy—this usually takes about 3-5 minutes. Then, add in those 3 large eggs one at a time, mixing well after each addition. Don’t forget to add 1 teaspoon of vanilla extract for that warm flavor that makes everything better! Your batter should look creamy and inviting at this point.
Combine Batter Ingredients
Time to bring it all together! Gradually add your dry ingredient mixture to the wet batter, mixing just until combined. Then, pour in 1/2 cup of whole milk, and mix until you have a smooth batter. It should be thick but pourable—just the way you want it for a pound cake!
Create the Marble Effect
Here’s where the magic happens! Take half of your batter and gently fold it into the chocolate mixture we made earlier. Make sure it’s well combined, then pour that chocolate batter into your prepared loaf pan. Next, carefully spoon the remaining yellow batter over the top, trying not to disturb the chocolate layer too much. Grab a knife and swirl it through the batter a few times to create that beautiful marbled effect! Don’t overdo it—just a few swirls will do the trick.
Baking Instructions
Cover your loaf pan with aluminum foil to keep the moisture in, and pop it into the oven. Bake for 30 minutes, then remove the foil and bake for an additional 30 minutes. You’ll know it’s done when a toothpick inserted into the center comes out clean. If you’re unsure, you can also gently press the top with your finger; it should spring back if it’s baked perfectly. Once it’s out of the oven, let it cool in the pan for a bit before transferring it to a wire rack to cool completely. Can you smell that? It’s going to be worth the wait!
Nutritional Information
Now, let’s talk numbers! While I believe in enjoying every slice of Marble Pound Cake, it’s good to know what you’re indulging in. Here’s a breakdown of the typical nutritional values per serving, which is about one slice:
- Calories: 316
- Fat: 16g
- Saturated Fat: 10g
- Trans Fat: 1g
- Cholesterol: 85mg
- Sodium: 144mg
- Carbohydrates: 40g
- Fiber: 1g
- Sugar: 23g
- Protein: 5g
Keep in mind that these values are estimates and can vary based on the specific brands of ingredients you use or any substitutions you might make. So, while you’re savoring that slice, know you’re treating yourself to something delicious!
Tips for Success
Now that you’re all set to bake your Marble Pound Cake, here are some tried-and-true tips to ensure it turns out perfectly every time! Trust me, these little nuggets of wisdom can make all the difference.
Watch Your Baking Time
Baking times can vary depending on your oven, so keep an eye on your cake! If you notice the top browning too quickly, you can tent it with aluminum foil to prevent it from burning while the inside finishes baking. Also, if you’re using a different size pan, adjust the baking time accordingly; a smaller pan may need less time, while a larger pan may require a bit more.
Ingredient Temperature Matters
Make sure your butter and eggs are at room temperature before you start. This helps them incorporate better into the batter, leading to a nice, even texture. If you forget to take them out ahead of time, you can warm your eggs in a bowl of warm water for about 10 minutes and soften butter in the microwave for a few seconds—just be careful not to melt it!
Experiment with Flavor Additions
While this recipe shines on its own, feel free to get creative! You can add a teaspoon of almond extract for a lovely twist or some orange zest for a refreshing touch. You could even throw in some chocolate chips for extra chocolatey goodness. Just remember, if you add too many extras, you might need to adjust the baking time.
Storage Tips for Freshness
If you have leftovers (which is rare, trust me!), store your Marble Pound Cake in an airtight container at room temperature for up to three days. For longer storage, you can wrap it tightly in plastic wrap and freeze it for up to three months. Just let it thaw at room temperature when you’re ready to enjoy another slice!
Don’t Rush the Cooling Process
After baking, give your cake time to cool in the pan for about 10-15 minutes before transferring it to a wire rack. This helps it firm up, making it easier to slice without crumbling. I know it’s tempting to dive in right away, but patience will reward you with beautiful slices!
With these tips in your back pocket, you’re all set to create a Marble Pound Cake that will impress everyone. Happy baking!
Serving Suggestions
Now that you’ve baked your gorgeous Marble Pound Cake, let’s talk about how to serve it up! The beauty of this cake is that it’s versatile, fitting right in for any occasion.
For a simple yet delightful treat, you can serve slices plain, letting the rich flavors of chocolate and vanilla shine through. If you want to elevate it a bit, a light dusting of powdered sugar adds a touch of elegance and sweetness. Just sift it over the top right before serving for that fancy café vibe!
Feeling a bit indulgent? Pair a slice of Marble Pound Cake with a dollop of fresh whipped cream or a scoop of vanilla ice cream. The creaminess complements the cake’s moist texture beautifully and makes for a delightful dessert experience.
And let’s not forget about beverages! This cake is perfect alongside your favorite cup of coffee or a soothing cup of tea. The flavors harmonize so well, making each bite and sip a little moment of bliss. Trust me, it’s pure heaven on a rainy afternoon or during a cozy gathering with friends.
Whether you keep it simple or dress it up, your Marble Pound Cake is sure to impress. Enjoy every delicious bite!
Storage Instructions
Alright, so you’ve baked this amazing Marble Pound Cake and have some leftovers—if that’s even possible! Here’s how to keep it fresh and delicious for days to come.
First off, make sure to let the cake cool completely at room temperature before storing it. This prevents any moisture from getting trapped and turning your lovely cake soggy. Once it’s cool, wrap your Marble Pound Cake tightly in plastic wrap or aluminum foil. This is key for keeping it moist and flavorful!
If you want to store it for a longer period, I recommend placing the wrapped cake in an airtight container. It’ll stay fresh at room temperature for up to three days—ideal for snacking after dinner or with your morning coffee!
Now, if you’re looking to save it for later, you can freeze the cake. Wrap it well in plastic wrap and then in aluminum foil to protect it from freezer burn. It can last for up to three months in the freezer. When you’re ready to enjoy another slice, just let it thaw in the fridge overnight or at room temperature for a couple of hours. It’ll taste just as delightful as the day you baked it!
Reheating is super simple, too! If you want to warm up a slice, pop it in the microwave for about 15-20 seconds. Or, if you prefer it a bit crispy, you can place it in a toaster oven for a few minutes. Just keep an eye on it so it doesn’t get too toasty! Trust me, there’s nothing like a warm slice of Marble Pound Cake to brighten your day.
FAQ about Marble Pound Cake
Got questions about making your Marble Pound Cake? Don’t worry, I’ve got you covered! Here are some common queries I hear, along with my best tips and tricks to ensure your baking adventure goes smoothly.
Can I use a different type of flour?
While all-purpose flour gives the best texture, you can experiment with cake flour for an even lighter crumb. Just keep in mind that the structure might be a bit different. If you try it, let me know how it turns out!
What should I do if my cake doesn’t rise?
Oh no! If your cake doesn’t rise, it could be due to old baking powder. Always check the expiration date before using it! Also, make sure to cream the butter and sugar well; that helps create those important air pockets. If you’re still having trouble, consider checking your oven temperature with an oven thermometer.
How can I make this recipe gluten-free?
Great question! You can substitute the all-purpose flour with a gluten-free baking blend. Just ensure it’s a one-to-one ratio blend that includes xanthan gum for structure. I haven’t tried it myself, but I’ve heard it works well!
Can I add nuts or chocolate chips to the batter?
Absolutely! Adding nuts like walnuts or pecans will give a lovely crunch and flavor contrast. Just be sure not to overload the batter; a half-cup or so should do the trick. If you’re a chocolate lover, throw in some chocolate chips for extra indulgence!
Why is my cake crumbly and dry?
Ah, the dreaded dryness! This could happen if you overmixed the batter or didn’t measure your flour correctly. Always spoon the flour into your measuring cup instead of scooping it directly, which can pack it down and add too much. Also, avoid overbaking—keep an eye on it during the last few minutes!
Can I make this cake in advance?
You sure can! Marble Pound Cake actually tastes even better after a day or two, as the flavors have time to meld. Just store it properly, as I mentioned earlier, and it’ll be ready to serve whenever you are!
For more recipes follow me in page Pinterest.
If you have any other questions, feel free to reach out! Baking is all about experimenting and having fun, so don’t hesitate to make this Marble Pound Cake your own!
Print
Marble Pound Cake: 7 Reasons You’ll Love This Decadent Treat
- Total Time: 1 hour 20 minutes
- Yield: 1 loaf 1x
- Diet: Vegetarian
Description
A rich and moist marble pound cake with a blend of vanilla and chocolate flavors.
Ingredients
- 2 cups flour
- 2 teaspoons baking powder
- 1/4 teaspoon salt
- 15 tablespoons unsalted butter, softened and divided
- 4 tablespoons unsweetened cocoa powder
- 1 1/3 cups sugar
- 3 large eggs
- 1 teaspoon vanilla extract
- 1/2 cup whole milk
Instructions
- Preheat oven to 350 degrees.
- Grease a 9 inch by 5 inch loaf pan and line it with parchment paper; grease the parchment paper as well.
- Melt 3 tablespoons of butter in the microwave, using 30 second increments until fully melted. Mix the cocoa powder into the melted butter until well combined.
- Mix the flour, baking powder, and salt in a separate bowl.
- Using a mixer, combine the remaining 12 tablespoons of softened butter with the sugar. Add the eggs and vanilla and mix well.
- Gradually mix in the flour mixture to the batter.
- Mix the milk into the batter.
- Take half of the batter and mix it into the butter-cocoa mixture until fully combined.
- Pour the cocoa batter into the loaf pan.
- Gently spoon the yellow cake batter into the loaf pan.
- Using the tip of a knife, swirl the batter gently for a few seconds.
- Cover the loaf pan with aluminum foil and bake for 30 minutes.
- Uncover and bake for an additional 30 minutes.
- Let cool before removing from loaf pan.
Notes
- Store leftovers in an airtight container.
- Can be served plain or with a dusting of powdered sugar.
- Prep Time: 20 minutes
- Cook Time: 1 hour
- Category: Dessert
- Method: Baking
- Cuisine: American
Nutrition
- Serving Size: 1 slice
- Calories: 316
- Sugar: 23g
- Sodium: 144mg
- Fat: 16g
- Saturated Fat: 10g
- Unsaturated Fat: 5g
- Trans Fat: 1g
- Carbohydrates: 40g
- Fiber: 1g
- Protein: 5g
- Cholesterol: 85mg
Keywords: Marble Pound Cake, Cake Recipe, Dessert