
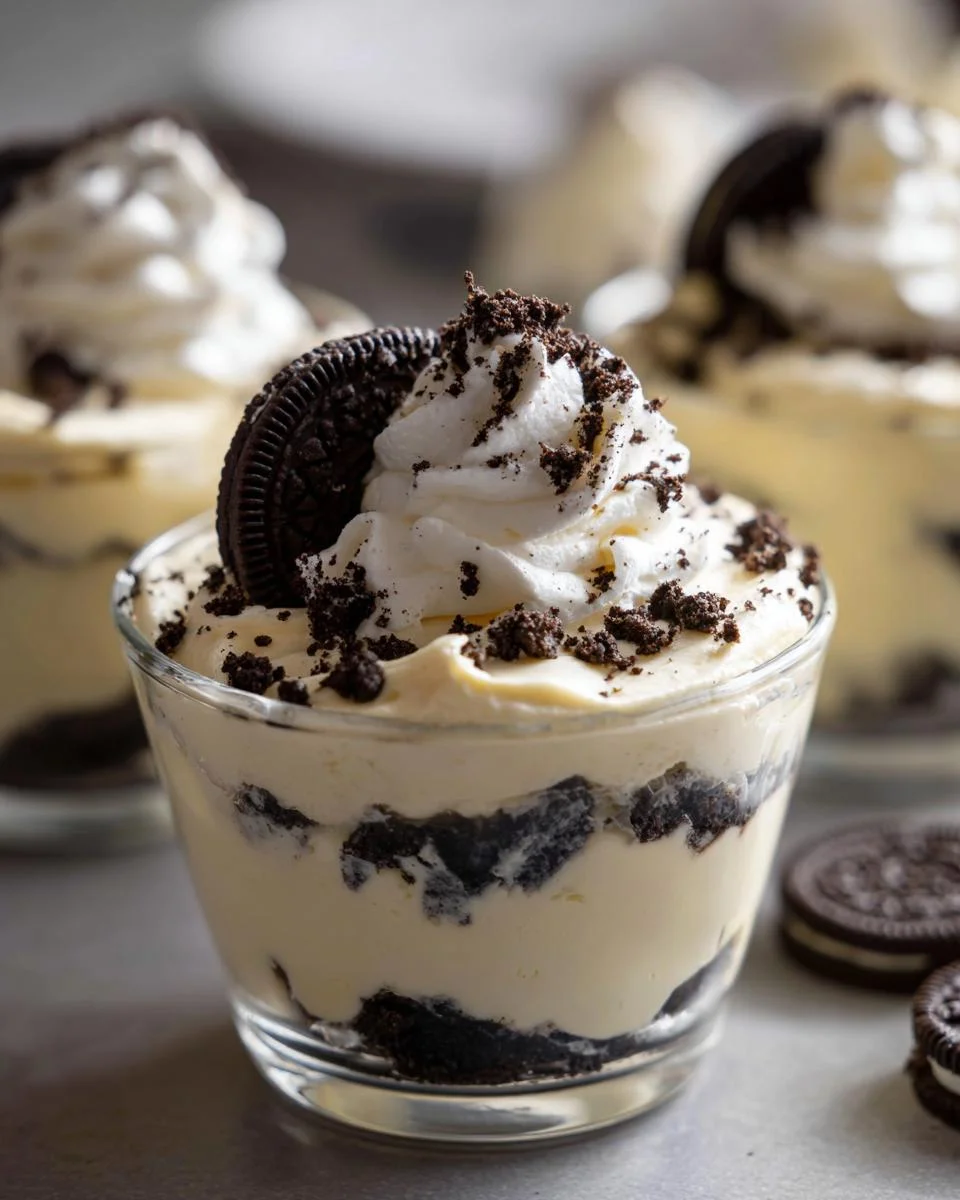
Oh my goodness, let me tell you, these Oreo No-Bake Cheesecake Cups are a total game changer! I first stumbled upon this recipe during a hot summer day when I just couldn’t bear to turn on the oven. The thought of whipping up a delicious dessert without any baking sounded too good to be true. But trust me, these little cups of joy are not only incredibly easy to make, but they’re also perfect for any occasion—whether it’s a casual family dinner, a birthday bash, or just a cozy night in while binge-watching your favorite show.
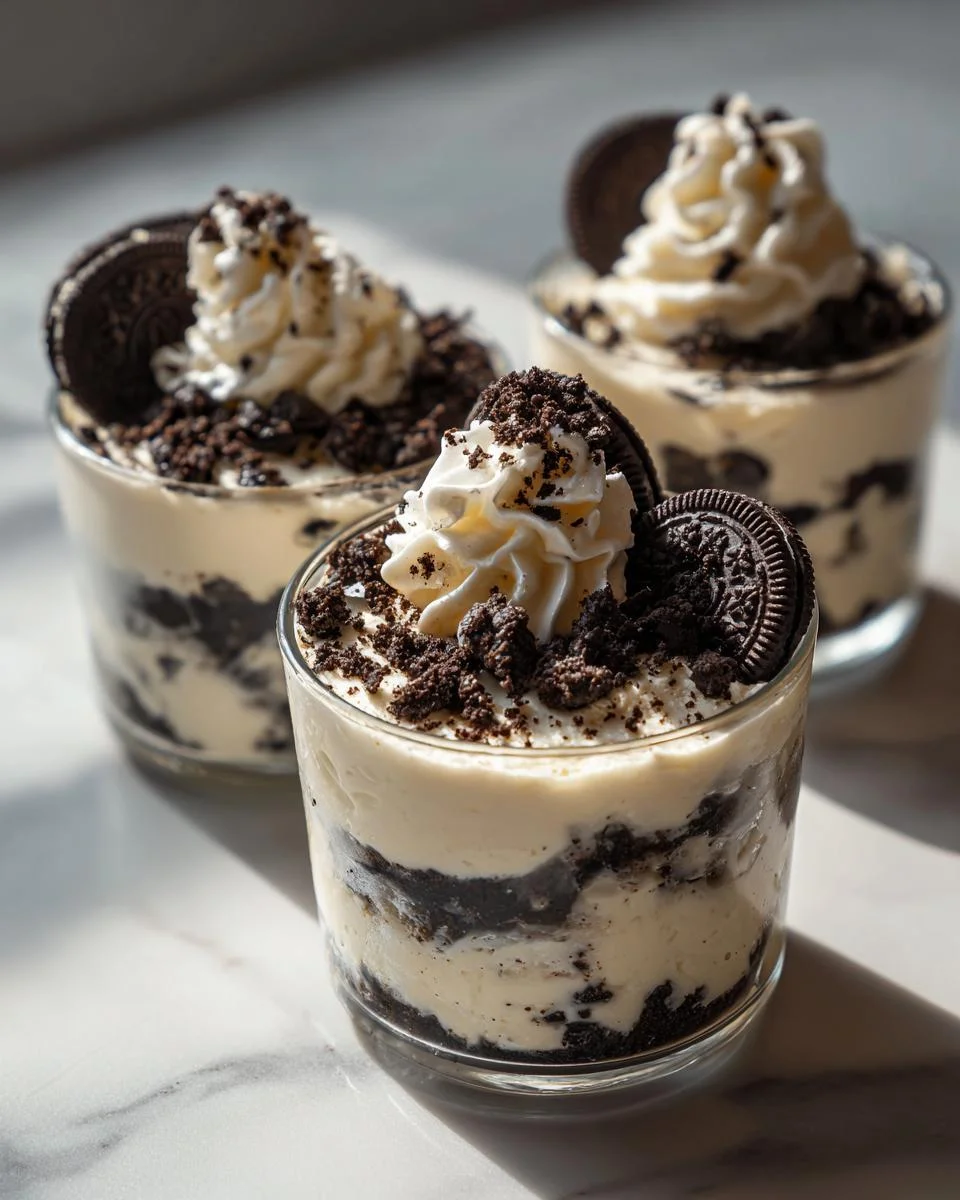
Every time I serve these, I’m met with smiles and satisfied sighs. The creamy cheesecake filling combined with the crunchy Oreo base creates a delightful contrast that keeps everyone coming back for seconds (and thirds!). Plus, there’s something so fun about eating dessert from a cup. It feels a bit fancy, don’t you think? So, if you’re ready to impress your friends and family with a no-fuss yet utterly delicious treat, let’s dive into how to whip up these Oreo No-Bake Cheesecake Cups!
Ingredients for Oreo No-Bake Cheesecake Cups
Gathering the right ingredients is the first step to achieving these scrumptious Oreo No-Bake Cheesecake Cups. Here’s what you’ll need:
- 1 (8 oz) block of cream cheese, softened to room temperature for easy mixing
- 1 (8 oz) container of Cool Whip or your favorite whipped topping
- 2/3 cup powdered sugar, which sweetens the filling perfectly
- 1 teaspoon vanilla extract for that classic cheesecake flavor
- 24-26 Oreo cookies, plus a few extra for topping if you like!
Make sure your cream cheese is softened—this is key for a smooth and creamy filling. I like to take it out of the fridge about 30 minutes before I start. Trust me, it makes a world of difference!
How to Prepare Oreo No-Bake Cheesecake Cups
Now that you’ve gathered all your ingredients, it’s time to get your hands dirty and whip up these delicious Oreo No-Bake Cheesecake Cups. I promise it’s a breeze! Just follow these simple steps, and you’ll be enjoying this delightful treat in no time.
Step-by-Step Instructions
- First things first, grab those Oreo cookies! Place them in a sturdy plastic bag, seal it tight, and let out some of that pent-up energy by crushing them with a rolling pin or a sturdy wooden spoon. You want a mix of fine crumbs and some larger chunks for that perfect texture.
- Next, spoon about 1 1/2 to 2 tablespoons of the crushed Oreos into the bottom of your six small dessert dishes. It’s like creating a little Oreo foundation for your cheesecake bliss!
- In a mixing bowl, whip together the softened cream cheese and powdered sugar until the mixture is creamy and smooth. I usually use a hand mixer for this, but a whisk works too—just be prepared for a workout! Add in that teaspoon of vanilla extract and mix until fully combined. It smells heavenly!
- Now, let’s gently fold in the Cool Whip. I like to use a spatula to keep the mixture light and fluffy. Then, fold in the remaining crushed Oreos. This is where the magic happens—those Oreo bits will add a delicious crunch to the creamy cheesecake filling!
- Time to assemble! Divide the cheesecake filling evenly across the dishes, and press it down onto the layer of crushed Oreos below. This helps to create that perfect layering effect.
- Now, here comes the hardest part—patience! Chill the cups in the fridge for about an hour or until you’re ready to serve. This helps the flavors meld together beautifully.
- Finally, just before serving, top each cup with a dollop of whipped cream and a sprinkle of crushed Oreos on top. It’s the perfect finishing touch!
And there you have it! You’ve just made the most delightful Oreo No-Bake Cheesecake Cups that everyone will love. Enjoy the process and don’t be shy about sneaking a spoonful of that creamy filling while you’re at it—it’s a must!
Why You’ll Love Oreo No-Bake Cheesecake Cups
Honestly, these Oreo No-Bake Cheesecake Cups have so many amazing qualities that make them a must-try! Here are just a few reasons why you’ll fall head over heels for this sweet treat:
- Quick and Easy: With only about 20 minutes of prep time, you’ll have these delicious cups ready to chill before you know it! No baking means less time in the kitchen and more time enjoying.
- No Oven Required: Perfect for hot days or when you simply don’t feel like turning on the oven. You can whip these up any time of year!
- Decadent Flavor: The combination of rich cream cheese, sweet vanilla, and crunchy Oreos is simply irresistible. It’s a dessert that pleases every palate!
- Customizable: Feel free to mix it up! You can use different Oreo flavors or add fun toppings—your imagination is the limit!
- Perfect Portions: These individual cups are great for serving at parties or gatherings. Everyone gets their own little dessert, making them feel extra special.
- Make Ahead: You can prepare these cups in advance! Just chill them until you’re ready to serve, making them perfect for busy days or last-minute gatherings.
Seriously, what’s not to love? These little delights are bound to become a favorite in your dessert rotation!
Tips for Success with Oreo No-Bake Cheesecake Cups
Alright, let’s talk about some pro tips that’ll help you nail these Oreo No-Bake Cheesecake Cups every single time! I’ve learned a few tricks along the way that can make the process smoother and the results even more delightful.
- Soften Your Cream Cheese: Make sure that block of cream cheese is really softened. Leaving it out for about 30 minutes before you start will make it so much easier to mix and ensure a super creamy filling. Nobody wants lumps in their cheesecake!
- Crush the Oreos Right: When crushing your Oreos, don’t be afraid to leave a few larger chunks for texture. It adds a delightful crunch to your dessert. Plus, it’s kind of fun to smash them up, isn’t it?
- Don’t Overmix: When you’re folding in the Cool Whip, be gentle! You want to keep that light, airy texture that makes these cups so heavenly. Overmixing can lead to a denser filling, and we want to avoid that!
- Chill Time Is Key: Patience is a virtue! Chilling the cups for at least an hour allows the flavors to meld and the filling to set properly. If you can let them chill longer, even better! Trust me, the wait is worth it.
- Topping Ideas: Get creative with your toppings! While I love the classic whipped cream and crushed Oreos, you could also add chocolate drizzle, fresh berries, or even a sprinkle of chopped nuts for an extra crunch. Make it your own!
- Serving Size: If you’re hosting a crowd, double the recipe! These cups are so popular that they’ll disappear in no time. You don’t want to be left without any for yourself!
With these tips in your back pocket, you’re all set to create the ultimate Oreo No-Bake Cheesecake Cups that’ll have everyone raving. Happy baking (or should I say, assembling?)!
Variations for Oreo No-Bake Cheesecake Cups
The beauty of these Oreo No-Bake Cheesecake Cups is how versatile they are! You can tweak the flavors and mix-ins to fit any occasion or craving. Here are some fun variations that I absolutely love:
- Different Oreo Flavors: Why stop at classic? Try using mint Oreos for a refreshing twist or peanut butter Oreos for that rich, nutty flavor. You could even experiment with seasonal flavors like pumpkin spice or gingerbread during the holidays—yum!
- Chocolate Lovers Delight: Add a layer of chocolate ganache on top of the cheesecake filling. Just melt some chocolate with a bit of heavy cream, let it cool slightly, and pour it over before chilling. It’s pure decadence!
- Fruit Infusion: Mix in some crushed strawberries or raspberries into the cheesecake filling for a fruity burst. You could even top each cup with fresh berries for that gorgeous pop of color!
- Nutty Crunch: Fold in some chopped nuts like walnuts or pecans into the filling for an added crunch. You can even sprinkle some on top for a beautiful finish!
- Caramel Swirl: Drizzle some caramel sauce into the cheesecake filling before dividing it into cups. The salty-sweet combo with the Oreos is absolutely heavenly!
- Layered Delight: Instead of just a single layer, create a layered dessert by alternating between Oreo crumbs, cheesecake filling, and different toppings. It looks so impressive and tastes even better!
Feel free to get creative and make these Oreo No-Bake Cheesecake Cups your own! The possibilities are endless, and I can’t wait for you to try these variations. Let your imagination run wild in the kitchen!
Serving Suggestions for Oreo No-Bake Cheesecake Cups
So you’ve whipped up these delightful Oreo No-Bake Cheesecake Cups, and now you’re ready to serve them up! While they’re absolutely delicious on their own, pairing them with a few simple sides or drinks can really elevate the experience. Here are some of my favorite serving suggestions that’ll make your dessert spread even more enticing:
- Fresh Berries: A handful of fresh strawberries, raspberries, or blueberries adds a vibrant pop of color and a hint of tartness that complements the rich cheesecake perfectly. Plus, they look so pretty on the plate!
- Chocolate Drizzle: Drizzling some melted chocolate over the top of your cheesecake cups right before serving can take them to the next level. It’s a simple yet elegant touch that chocolate lovers will adore!
- Mint Leaves: Garnish each cup with a sprig of fresh mint for a fragrant touch. It adds a burst of color and a refreshing flavor that balances the sweetness of the cheesecake.
- Ice Cream: Serve a scoop of vanilla or cookies and cream ice cream alongside the cheesecake cups for a delightful contrast in texture and temperature. Trust me, the combination is heavenly!
- Whipped Cream: While you’ll already top your cups with whipped cream, consider serving extra on the side for those who want to pile it on. You can even flavor it with a touch of vanilla or cocoa powder for an extra kick.
- Sweet Beverages: Pair these treats with a sweet drink like a creamy milkshake, a cup of hot chocolate, or even a chilled coffee drink for a delightful dessert experience. You could even serve a dessert wine for a sophisticated touch!
These Oreo No-Bake Cheesecake Cups are already a crowd-pleaser, but adding a few of these serving suggestions will make your dessert presentation even more appealing. Enjoy the smiles from your friends and family as they dig into this delicious treat!
Storage & Reheating Instructions
Now, let’s chat about how to properly store your leftover Oreo No-Bake Cheesecake Cups. You’ll want to keep these delightful treats fresh so you can enjoy them later (if there are any leftovers, that is!).
To store, simply cover each dessert cup with plastic wrap or transfer them into an airtight container. They can be kept in the refrigerator for up to 3-4 days. If you’re like me and love a little extra crunch, hold off on adding any toppings like whipped cream or crushed Oreos until you’re ready to serve. This way, they stay nice and fresh and don’t get soggy!
As for reheating? You actually don’t need to! These cheesecake cups are best enjoyed cold right out of the fridge. If you happen to make a larger version of this dessert in a single dish, you can slice it and serve it chilled. Just keep in mind, they lose that delightful texture if they get warm, so stick to enjoying them cold.
And if you find yourself with a few cups left after a gathering, consider using them as a sweet treat for lunchboxes or as a quick snack during the week. Trust me, they’re so good that you might just want to hide them away for yourself!
Nutritional Information for Oreo No-Bake Cheesecake Cups
Let’s take a moment to appreciate the delightful balance of flavors in these Oreo No-Bake Cheesecake Cups by looking at their nutritional information. Each serving is a sweet indulgence that also brings some important nutrients to the table. Here’s the estimated breakdown per cup:
- Calories: 408
- Fat: 22g
- Saturated Fat: 11g
- Trans Fat: 0g
- Cholesterol: 48mg
- Sodium: 314mg
- Carbohydrates: 50g
- Fiber: 1g
- Sugar: 35g
- Protein: 5g
These numbers might make you feel a bit indulgent, but hey, a little treat now and then is good for the soul! Enjoy every creamy, crunchy bite of your Oreo No-Bake Cheesecake Cups without the guilt, knowing that sometimes, dessert is just what we need to brighten our day.
FAQ About Oreo No-Bake Cheesecake Cups
Got questions? Don’t worry, I’ve got you covered! Here are some common questions about these delightful Oreo No-Bake Cheesecake Cups, along with answers that’ll hopefully clear things up.
Q1: Can I use reduced-fat cream cheese for this recipe?
Absolutely! You can use reduced-fat cream cheese if you prefer, but keep in mind that it might alter the texture a bit. The filling may not be quite as rich and creamy, but it will still taste delicious!
Q2: How long do these cheesecake cups need to chill?
I recommend chilling them for at least one hour to let the flavors meld and the filling set properly. If you can wait longer, that’s even better! The longer they chill, the more the flavors develop—so patience pays off!
Q3: Can I make these Oreo No-Bake Cheesecake Cups in advance?
You sure can! These cups are perfect for making ahead of time. Just prepare them, cover them tightly, and store them in the fridge until you’re ready to serve. They’ll stay fresh for about 3-4 days!
Q4: Can I use other cookies instead of Oreos?
Definitely! While Oreos are classic, feel free to experiment with other cookies. Chocolate sandwich cookies, gingersnaps, or even graham crackers can make for a fun twist. Just adjust the amounts accordingly to fit your cookie choice!
Q5: What’s the best way to crush the Oreos?
The best way? It’s really up to you! You can use a rolling pin, a food processor, or even crush them by hand in a sturdy plastic bag. Just make sure to get a mix of fine crumbs and some larger bits for that delightful texture in your cheesecake cups!
For more recipes follow me in page Pinterest.
And there you have it! I hope these FAQs help you feel more confident in whipping up your own scrumptious Oreo No-Bake Cheesecake Cups. If you have any more questions, feel free to reach out! Happy baking (or assembling)!
Print
Oreo No-Bake Cheesecake Cups: 7 Blissful Flavors to Savor
- Total Time: 1 hour 20 minutes
- Yield: 6 servings 1x
- Diet: Vegetarian
Description
Delicious Oreo No-Bake Cheesecake Cups that are easy to make and perfect for any occasion.
Ingredients
- 1 8 oz block of cream cheese, softened
- 1 8 oz. Cool Whip or whipped topping
- 2/3 c powdered sugar
- 1 tsp vanilla
- 24–26 Oreo cookies, more as desired
Instructions
- Place the Oreos in a plastic bag and seal. Crush the Oreos with a rolling pin or sturdy wooden spoon.
- Spoon 1 1/2 – 2 tablespoons of the crushed Oreos into the bottom of 6 small dessert dishes.
- Using a mixer, whip cream cheese and powdered sugar until creamy and smooth. Add vanilla and mix in.
- Gently fold in the Cool Whip. Fold in remaining crushed Oreos.
- Divide the cheesecake filling evenly across the dishes and press onto the crushed Oreos.
- Chill for about 1 hour or until ready to serve.
- Top with whipped cream and more crushed Oreos before serving.
Notes
- You can layer this dessert or serve it in one larger dish.
- Any Oreo flavor can be used.
- Add peppermint extract and mint Oreos for a mint cookies and cream treat.
- Prep Time: 20 minutes
- Cook Time: 0 minutes
- Category: Dessert
- Method: No-Bake
- Cuisine: American
Nutrition
- Serving Size: 1 cup
- Calories: 408
- Sugar: 35g
- Sodium: 314mg
- Fat: 22g
- Saturated Fat: 11g
- Carbohydrates: 50g
- Fiber: 1g
- Protein: 5g
- Cholesterol: 48mg
Keywords: Oreo No-Bake Cheesecake Cups